
")
So you bought classic flower pots, but they all look the same. What now? A creative spirit like yourself surely can’t make peace with that! Perhaps you want to decorate them with some glitter? Fabric? Chalkboard paint? It often seems like a flower pot just doesn’t look good enough, almost as if it’s not worthy of housing your beautiful plants. But that’s something you can easily deal with. You just have to find a way to decorate the pots so they look exactly how you want them to. Having trouble coming up with a design? Check out these cute suggestions.
Interested in contemporary home decor? Here are some potpourri decor ideas to up your decor game.
15 Ways To Decorate Your Flower Pots
You put a lot of time and love into tending your flowers, shouldn’t the pots you display them in be beautiful too? This list of 15 DIY flower pots will help you to put more fantastic floral displays around your home.
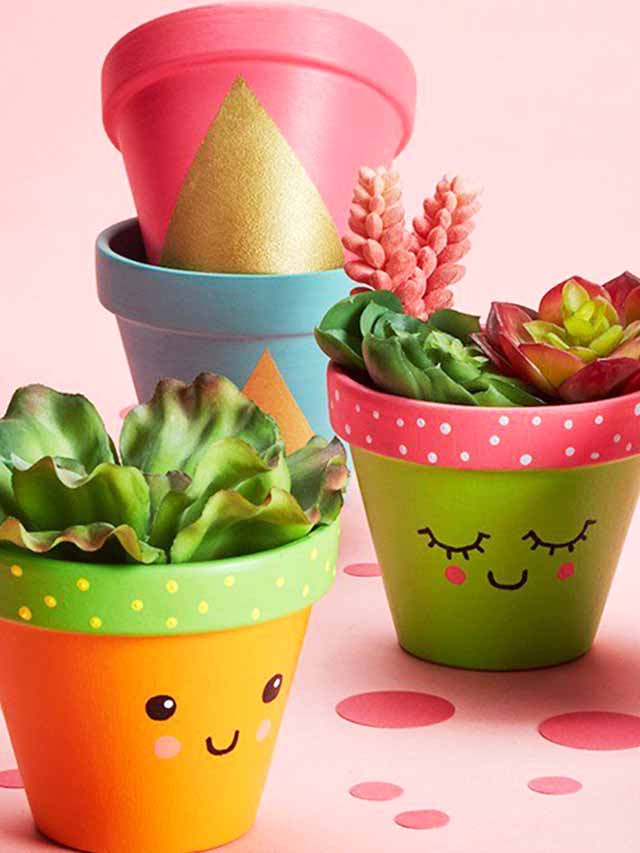
1. Pretty Faces On Pots
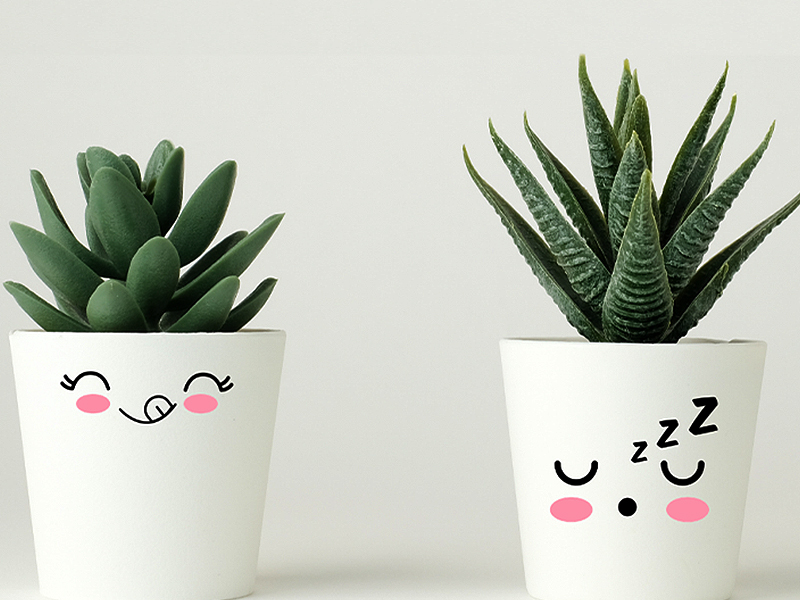
You will not be able to resist making a few pretty faces to add to my mix! These cuties are super quick and the planters could be any colour, so you might not even need to paint yours. They make adorable decor items and gifts or party favours!
Method:
- Paint the pots white (or any colour you want!). It may take several coats. Acrylic paint works great too!
- Once dry, draw your face with a pencil on the best-looking part of the pot.
- Think about the eyelash thickness, small smiles, or pretty full lips, and blush!
- If you mess up, just erase it and start over! Once you have a face you like, use your markers or paint pens to fill in the lines.
- Add a little blush using acrylic paint or a pretty pink permanent marker.
- Add some embellishments to add a little more colour. You could add polka dots or paint it a solid colour or embellish the saucer.
2. Nail Polish Marbled Flower Pots

These nail polish marbled flower pots would make a unique and colourful addition to your backyard, garden, or home! Since nail polish dries quickly, you’ll get satisfyingly fast one-of-a-kind results. You can also use this technique to marble pretty much anything, and you’ll definitely want to!
Method:
- Paint your pot with white enamel spray paint so that the nail polish colours would pop. If you are using pastel-coloured nail polish, you could probably leave your pot terracotta-coloured. You can invert your pot over a tin can to keep it off of the ground while painting.
- Take a container (not too deep but big enough to rotate the pot in it) and start by filling your container with lukewarm water. Wear gloves for the next part.
- Pour your nail polish from the bottle into the water. Try to pour slowly and close to the surface of the water so that your nail polish doesn’t sink to the bottom of the container in globs. The first colour that you start with should be your lightest because it will spread out.
- If you are finding that the polish dries too quickly, or doesn’t spread out, try adding a little bit of nail polish remover or acetone to the water.
- Next, pour in your second colour. Use a toothpick to swirl the colours and get a marble happening. Limit the number of colours you use to 1-3.
- Start at one end of your container and touch the side of your pot to the surface of the water.
- Rotate your pot so that the nail polish wraps around it. Place your pot on a paper towel to dry.
- Add a few coats of clear enamel paint to protect your design. Also, seal the inside of your pot if you are using terracotta pots because terracotta likes to absorb water and the water might push off the paint. And done!
3. Rope-Wrapped Pots

This is one of those easy and inexpensive projects that adds a touch of texture and interest to your pots. Want to learn how to make compost at home? Here are some tips-n-tricks, quickly have a look here.
Method:
- Pick out the pot you want to decorate and a rope long enough to cover the whole pot.
- Start at the top and begin hot glueing your rope down to the pot. Continue to do this around the pot all the way to the bottom.
- Snip off the rope and secure it with hot glue.
- Using paint and a standard paintbrush, you can add a touch of blue to the base of the rope wrapped pot.
4. Gold Flower Pots

You will love the gold trendy pots and this is such an easy project to bring in a touch of gold in your home. And don’t forget you’re bringing in some extra oxygen with the plants too!
Method:
- Paint the pot white and make sure it dries off completely.
- After painting the pot, use tape and put the tape around the pot in the middle.
- Apply glue to the lower half of the pot and pour golden glitter on it.
- With this glitter pot, you will need to allow it to dry completely, and then the next day, cover the glitter with a coat of glue to keep the glitter in place.

5. Sand Covered Pots

When you go to the beach, everything gets covered with sand. So why not get your creative juices flowing and try this beautiful sand covered pot.
Method:
- First, coat the pot in the glue, working in quarter sections.
- Then, dribble the sand onto the glue-covered pot, pat it lightly to help secure the sand in place.
- Finally, leave the pots in the sun for a bit until the sand hardens and dried.
- Find a ribbon and tie it around the pot.
- Once added the ribbon, simply hot-glued a single shell onto each pot. You could add several smaller shells. And voila!
6. Photo Flower Pots

Who doesn’t like picture frames? And when you can make it out of a pot then why wait to try!
Method:
- Paint the pot black.
- Put glue on the pot once it has dried and then paste the pictures. Leave it to dry.
- Add some ribbon to the top and bottom of the photos. Then finish things off with some sweet little bows.
7. Cheerful Fabric Covered Pots

You’re just a few easy steps away from a DIY masterpiece! These cheerful fabric covered pots can hold flowers, craft supplies, pens and pencils, or whatever strikes your fancy!
Method:
- Cut the fabric to fit around the pot. Put glue on one end of the fabric and glue it to the pot.
- After the edge dries, spread Mod Podge on the rest of the pot and carefully smooth the fabric over it.
- Cut slits in the fabric around the top.
- Glue the ends of the fabric to the inside of the pot.
- Let it dry, and enjoy the loveliness!
8. Teacher’s Flower Pots

You might have a chalkboard at home, but writing can be more fun when it’s done on a pot! Your kids will have a blast with this chalk flower pot!
Method:
- Start by painting a coat of chalkboard paint on the flower pot, leaving the rim bare, using vertical brush strokes. Let that dry for about an hour, and then apply another coat horizontally. This makes sure you get everything well covered. (If you’re using spray chalkboard paint, just follow the directions on the can.)
- Paint the rim and part of the inside yellow.
- Once the yellow paint dried, add the ruler lines all around the rim of the pot with a paint pen.
- Now it’s ready for planting. And write your message on the chalkboard with your chalk.
9. Lace Covered Pots

A little decorating and these lace covered pots look so pretty in a group. Do you want to make your own set? Learn here.
Method:
- Brush glue all over your pot.
- Adhere lace and then brush an extra layer of glue over the top to seal.
- Allow your new pots to dry completely before you use them.
10. Fingerprint Flower Pots

Painting a pot with fingerprint flowers is a fun and easy DIY project for kids of all ages. Plant the finished painted pot with a seed or small plant, and you’ve got the perfect gift or a perfect decorative item for your home. This activity can be done with your children, as a type of bonding experience.
Method:
- Take your terracotta pot and paint it with your favourite acrylic colour. Set aside and let it dry before continuing.
- Dip your fingers in paint and make flowers of your fingerprints all over the pot. Use different colours.
- When it dries, paste a button in the middle of your flowers. And there you have it. A wonderful fingerprint flower pot!

11. Night Sky Coloured Pots

If you’re a fan of the night sky, then you must try this DIY pot design! It’s mysterious, intriguing, and a good foil for almost any plant.
Method:
- Soak the pot in a tub of warm water for up to an hour, then scrub it with a stiff brush.
- Put the paint for the base coat on a plastic plate and thin it with a small amount of water.
- Extend the paint an inch or so, down into the top of the pot, but do not cover the bottom, which should be left clear for optimal drainage.
- After the blue base coat has dried completely, choose a colour for the stars. (Use gold, silver, or pearlescent white.) With a cotton swab, apply a liberal dot of the paint onto the side of the pot.
- Make more stars at random spots on the pot until you have as many as you want.
12. White & Golden Pattern Pots

A coat of white paint and a gold permanent marker is all it took to make this ritzy herringbone pattern planter. A neutral gold and white pot will make a strong statement in the garden.
Method:
- Start by painting your clay pots with a couple of coats of white craft paint.
- Once it is dry, use a Sharpie (oil-based) gold paint pen to sketch on your herringbone lines. You can start with a rim around the top.
- Next, sketch somewhat straight lines from the top line.
- Once all the vertical lines had been sketched, start joining them together with angled (or diagonal) horizontal lines.
- Once you have your first group of horizontal/diagonal lines sketched, continue adding them, creating a herringbone design.
- After completing the pattern, paint the top ledge of the clay pots with a couple of coats of my elegant gold craft paint.
13. Rubber Band Painted Pots
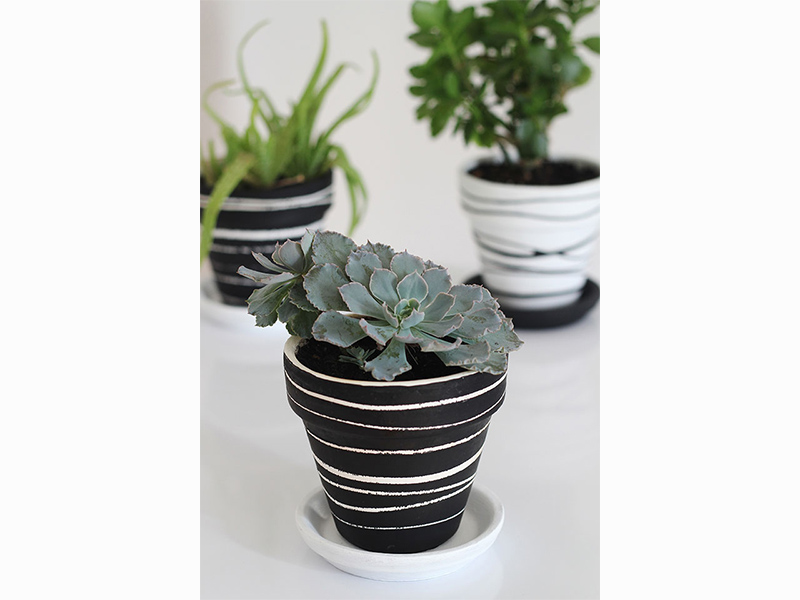
This might be one of the easiest pot painting ideas, it doesn’t require too much effort but still looks delightful.
Method:
- Paint the entire terracotta pot with a base colour, i.e. the colour that will show up as the lines. Wait until dry.
- Wrap rubber bands around the pot.
- Paint over the terracotta pot with top colour. If you are going from dark to light, you will need to use more than one coat of light-coloured paint. Wait until dry, and remove rubber bands.
14. Watermelon Colour Pots

Painting terracotta pots is such a fun project to add colour and your own personal style to your home or garden. And if you are looking for an effortless yet fruity design, this is the one. It is easy and adorable.
Method:
- Paint the top of your pot with green colour.
- Let it dry completely and then colour the bottom part with red.
- After it dries, add black dots and voila!
15. Ladybug Design Pots

Make your pot planters beautiful with this ladybug design! This adorable decoration will brighten up your outdoor space and is also easy for kids to try!
Method:
- Colour your pot with the base colour of red, and let it dry.
- Use a white round sponge brush to add the white portion of the eyes.
- Then use a paintbrush to start adding the black accent down the middle as well as all the way around the bottom.
- Be sure to paint all the way around the bottom with the black line to give your pot a finished appearance.
- Then use a smaller round sponge brush to add the dots on the ladybug. Again be sure to go all the way around the pot.
- Once the white portion of the eyes is dry, you can add the black portion with a small round sponge brush. Then allow your entire clay pot to dry before using.
Tired of the traditional look of terracotta plant pots? Spice them up with a fresh coat of paint. Add a bit of colour to your garden by adding hand-painted plant pots that fit your style. Or create a cute theme by painting a matching set. Pot decoration ideas like these are so easy and oh so cute! Try these easy DIYs and tell us your favourite in the comments!