
")
Every home is a reflection of the people who live inside it. Whether it is a childhood home, ancestral property or a rented premise, you always want to come back to the comfort and warmth of your home. Adorning the walls with a decorative accent, painting and/or a tapestry wall hanging has been an age-old way of giving character to space, a technique that is widely prevalent even today. If you want to make some easy home decor purchases from desi brands, head on over to the Red Dot Shop here. And if DIY calls your name, here are 10 easy-to-make stunning wall decor items!

10 DIY Wall Hanging Decor Ideas
1. Macrame Wall Hanging
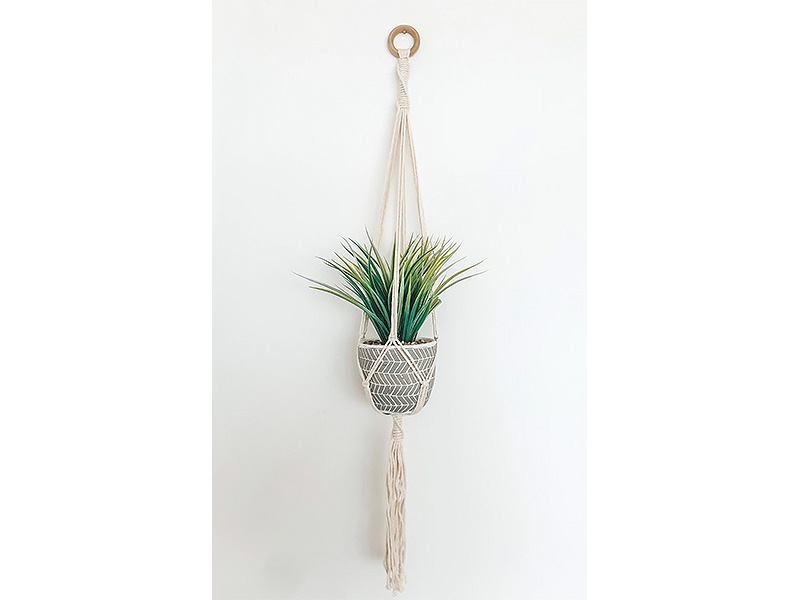
Indoor plants are a great way to bring nature into the house. This macrame wall hanging works as a pretty and sturdy decor item that can hold your planters. Using just one simple macrame knot, you can create this gorgeous looking wall hanging in a very short span of time.
You Will Need:
- Macrame cord
- Scissors
- Metal ring
- Planter
Method:
- Cut the macrame cord into eight equal size pieces. The length of the cord will depend on the size of the planter. An approximate length of 8 feet is suitable for a medium-sized planter.
- Loop all the eight pieces of cord through the metal ring so you have sixteen cords hanging at the bottom of the ring.
- Use another piece of macrame cord and wrap it around the top of the sixteen strands.
- Hang the metal ring on a hook or a door to make the process easier.
- Divide the cord into four sections, each having four strands.
- Take one section and use a pencil to mark two points where the macrame knots will be made. Repeat the same markings on the other three sections.
- Create a square knot in the first section. This is done by working on the outer cords while keeping the centre cords untouched. Start by taking the left cord on top of the central two and under the right. Now take the right cord under the central two and over the left cord. Pull to create the knot. Repeat this process one more time to finish the knot.
- Repeat the process on the other three sections.
- For making knots on the second marking, take two strands from one section and join them with two strands from the section on the right. Repeat the process of the square knot.
- Continue making square knots on all four sections.
- You will now have a slot to insert the planter into.
- Tie all the sixteen strands together at the bottom of the slot.
- Use a new piece of cord and wrap it around the whole section.
- Insert the planter and display.
2. Wall Hanging With Paper

Gift wrappers, card papers and textured sheets, every household has an assortment of coloured paper we don’t know what to do with. This beautiful wall hanging with paper makes use of all those odd scraps that have the potential to become a wall art masterpiece.
You Will Need:
- Coloured papers of your choice
- Scotch tape
- Scissors
- Glue
- Clothespin
- String
Method:
- Choose a coloured paper of your choice. If the paper is rectangular in shape, cut it into a square.
- Place the paper on a flat surface with its decorative side down.
- Fold the paper in half to expose the decorative side.
- Make half an inch fold inwards on one side of the paper.
- Continue making the same size folds on facing opposite sides (accordion style). Ensure that the last fold is on the same side as the first. (You can adjust the thickness of the folds to make this happen.)
- Now tie the string tightly at the centre of the folded paper.
- Fan out both sides of the paper and apply glue to join the ends.
- Secure the ends with a clothespin till the glue dries.
- Repeat the same process with other sheets of paper so you have paper fans of different colours and sizes.
- Use the strings and glue to create a pattern by placing the fans on top of one another.
- Use scotch tape to stick the arrangement on the wall. You can also punch holes and insert a string if you wish to hang your creation on the wall.
3. Paper Flower Wall Hanging

This wall hanging with paper is so easy and quick to make that it can be a wonderful project to undertake with kids. They bring a pop of colour to almost any wall of the home, making the home look like a fun and cheerful space.
You Will Need:
- Chart paper in any colour
- Paints and paintbrush
- Scotch tape
- Scissors
- Glue
- Cardboard
- String
Method:
- Cut the chart paper into rectangular chits. The size and number of these chits will depend on the intended size of the wall hanging.
- Fold the edges of all the chits in the inward direction to make a cone. Use glue to secure the ends.
- Cut the cardboard in the shape of a circle.
- Colour the centre of the circle with the help of the paint and paintbrush.
- Use glue to stick the chart paper cones around the coloured centre of the cardboard. The edges of the cardboard should be completely covered with paper cones.
- Take seven pieces of string of varying lengths and stick one chart paper cone to their ends using glue.
- Stick the strings to the back of the cardboard in a pattern of your choice.
- Take a long piece of string, fold it in half to make a loop.
- Join both the loose ends of this string and stick them on top of the wall hanging with the help of scotch tape.
4. Metal Wall Hanging
Creating a cosy and inviting home does not necessarily require expensive accents. With a little bit of creativity, things that are no longer in use can be turned into striking wall hanging decor items. This DIY wall hanging helps you make use of old sieves to add utility and aesthetics to your bare walls.
You Will Need:
- Metal sieves of various sizes
- Wooden planks
- Drill machine
- Saw
- Nails
- Decorative items like succulents and figures
Method:
- Visualize the wall hanging design to decide how many sieves you will need and how the planks will be placed in them.
- Once you know where the wooden plank is to be placed, measure and cut the plank with the saw to the size of the inside of the metal sieve.
- Keeping the plank in position, drill a hole through the side of the sieve and insert a nail to fit the plank into it. Repeat on the other side.
- Repeat this process with the other planks and sieves.
- Drill a hole on the back of the sieve and insert a nail to facilitate hanging the decor to the wall.
- Decorate the wall hanging with items of your choice.
5. Wooden Wall Hanging

Rustic home decoration accents have become very popular in the recent past. While such decorative pieces are available in the market at exorbitant prices, easy wall hangings like this one can be easily made at home at a fraction of the cost (or sometimes even for free.)
You Will Need:
- Cardboard
- Jute string
- Scissors
- Strong adhesive
- Twigs of various lengths
Method:
- Use the scissors to cut the cardboard into a circular ring.
- Using the adhesive, wrap the jute string all over the ring.
- Take a long piece of the jute string and tie to make a loop around the ring.
- Go on sticking the twigs on top of the ring till the entire circumference is covered.
- You can also choose to spray paint the wall hanging in a metallic colour for a sophisticated look.
6. Newspaper Wall Hanging
The next time you think of selling old newspapers to the raddiwala, think of how many creative things you can make out of them. This newspaper wall hanging is one way to completely transform old newspapers into an amazing adornment for your wall.
You Will Need:
- Old newspapers
- Paints and paintbrush
- Scissors
- Glue
- Water
- Canvas board/ wooden plank
Method:
- Start by rolling the newspapers tightly until you reach the desired thickness.
- Stick the edges together with glue so the rolls don’t loosen up.
- Keeping three rolls long, cut up the rest of the rolls into shorter pieces.
- Make a mixture with equal amounts of glue and water.
- Apply the mixture all over the rolled newspapers.
- Now use the desired combination of paints to colour the rolls.
- Using glue, stick the longer newspaper roll in the centre of the canvas board/wooden plank to create the vein of the leaf.
- Arrange the other shorter pieces around the vein to create a leaf pattern. Stick them with glue.
- Repeat the process to create two more leaves on either side.
7. Dream Catcher Wall Hanging
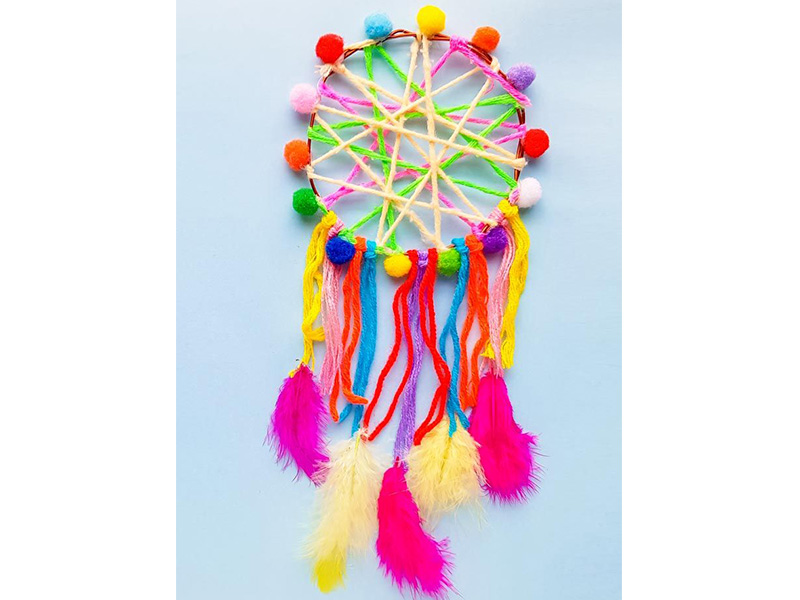
A dream catcher is meant to protect us from evil spirits and nightmares. Along with this, dreamcatchers also make eye-catching wall hangings. They are an extremely versatile home decor option because of the endless designs that can be created using flowers, yarn, pompoms, crochet and other materials.
You Will Need:
- Embroidery hoop
- Scissors
- Strong adhesive
- Pom poms (one or more colours)
- Tassels
- String
- Beads (optional)
Method:
- Apply adhesive all over the embroidery hoop and stick pom-poms of your choice of colours to it.
- Cut two short, two medium and one long piece of string.
- Tie a tassel each to the bottom of all these strings.
- If you are using a wooden bead, insert it through the string so that it rests just above the tassel.
- Insert two pom-poms through all the strings, place them in a way that they form a cascading pattern when all the strings are attached to the dream catcher.
- Tie the upper end of the strings to the inside of the embroidery hoop and secure with the adhesive.
- Create a loop with a long piece of string and attach it to the top of the dreamcatcher.
8. Fabric Wall Hangings

All you need for this wall hanging is some embroidery hoops and leftover fabrics. If you don’t already have a bag full of loose fabric at home, pay a visit to the local darzi and he will thank you for taking them off his hands. The colours, prints and textures of the fabrics can be chosen to complement the colour scheme of the home or to create a stark contrast.
You Will Need:
- Embroidery hoops of different sizes
- Pieces of colourful fabric
- Scissors
Method:
- Make a mental map of how many hoops you want to place on the wall and choose the hoop sizes and fabrics accordingly.
- Open the embroidery hoop and place the fabric on top of the inner ring.
- Place the outer ring on top of the fabric and screw it rightly.
- Cut the excess fabric at the back of the hoop with scissors.
- These loops can be directly hung on a wall with nails drilled into it.
9. Mandala Wall Hanging

Making this wall hanging is going to help you save money, make your wall look beautiful and also assist with reducing your stress levels. Mandala art is a very popular way of destressing and battling anxiety while creating beautiful and colourful patterns. It will also provide you with an opportunity to showcase your creativity.
You Will Need:
- Card paper
- Compass
- Pencil
- Earbuds
- Toothpicks
- Acrylic paints
- Wall photo frame
Method:
- Cut the card paper to fit the wall photo frame.
- Use the pencil and compass to make concentric circles on the chart paper. Ensure that the pencil is not too dark.
- Use the earbuds dipped in acrylic paint to make colourful dots on the circles.
- For thin lines and designs, dip the toothpick in acrylic colours.
- Create a mandala using the design and colours of your choice.
- Let the mandala dry completely.
- Insert the card paper in the wall photo frame and display.
10. Wine Cork Ombre Wall Hanging

A glass of wine can instantly drive away blues and this beautiful wall hanging can instantly perk up a room. Made with used wine bottle corks, this DIY project takes barely any time and effort. You can choose to make it in any design you please, with any colour you choose.
You Will Need:
- Cardboard
- Wine corks
- Paints and paintbrush
- Glue
- String
- Pencil
- Scissors
Method:
- Draw a heart shape on the cardboard and cut it.
- Apply glue all over the cardboard shape and stick wine corks to cover the entire area.
- Use paints of your choice to colour the wine corks.
- Use the string to make a loop and stick it at the back of the cardboard.
Choosing home decoration items can be an extremely taxing affair considering the varied preferences and personalities of people. It is quite common for people to go on a neverending spree looking for pieces that best reflect their aesthetic sense. In such situations, creating your own wall hangings is a great way to ensure that you get exactly what you are looking for. This process can be therapeutic, economical and extremely gratifying.