

Yoga has two basic components while practising it as a daily routine. One of which is a pose known as asanas and the other called as pranayama which improves your breathing techniques. Those with a restricted physical condition can improve their lifestyle by practising yoga. As gyms and other fitness categories have levels for beginners, weight-loss or customised as per the physical strengths, likewise yoga can be practiced as per the physical needs.
People with lung disease or respiratory troubles can practise yoga to improve their breathing techniques and condition. It’s a myth that patients with COPD (chronic obstructive pulmonary disease) cannot practise pranayama. The patients if guided under a practitioner will be able to lead a healthy lifestyle. In the current coronavirus pandemic situation, Yoga will be beneficial more than even. As hospitals are crowded with covid-19 cases, patients with lung and respiratory conditions and otherwise have been asked to stay home but one can turn the situation around and practise yoga asanas and pranayama and stay fit. Yoga benefits are just not restricted to strengthening lungs, it can also help in balancing your pitta dosha which gives you another reason to practice yoga daily.
Here are some yoga exercises effective for lung and respiratory troubles suggested by Paramita Singh nutritionist cum yoga practitioner expert.
1. Virasana (Hero Pose)

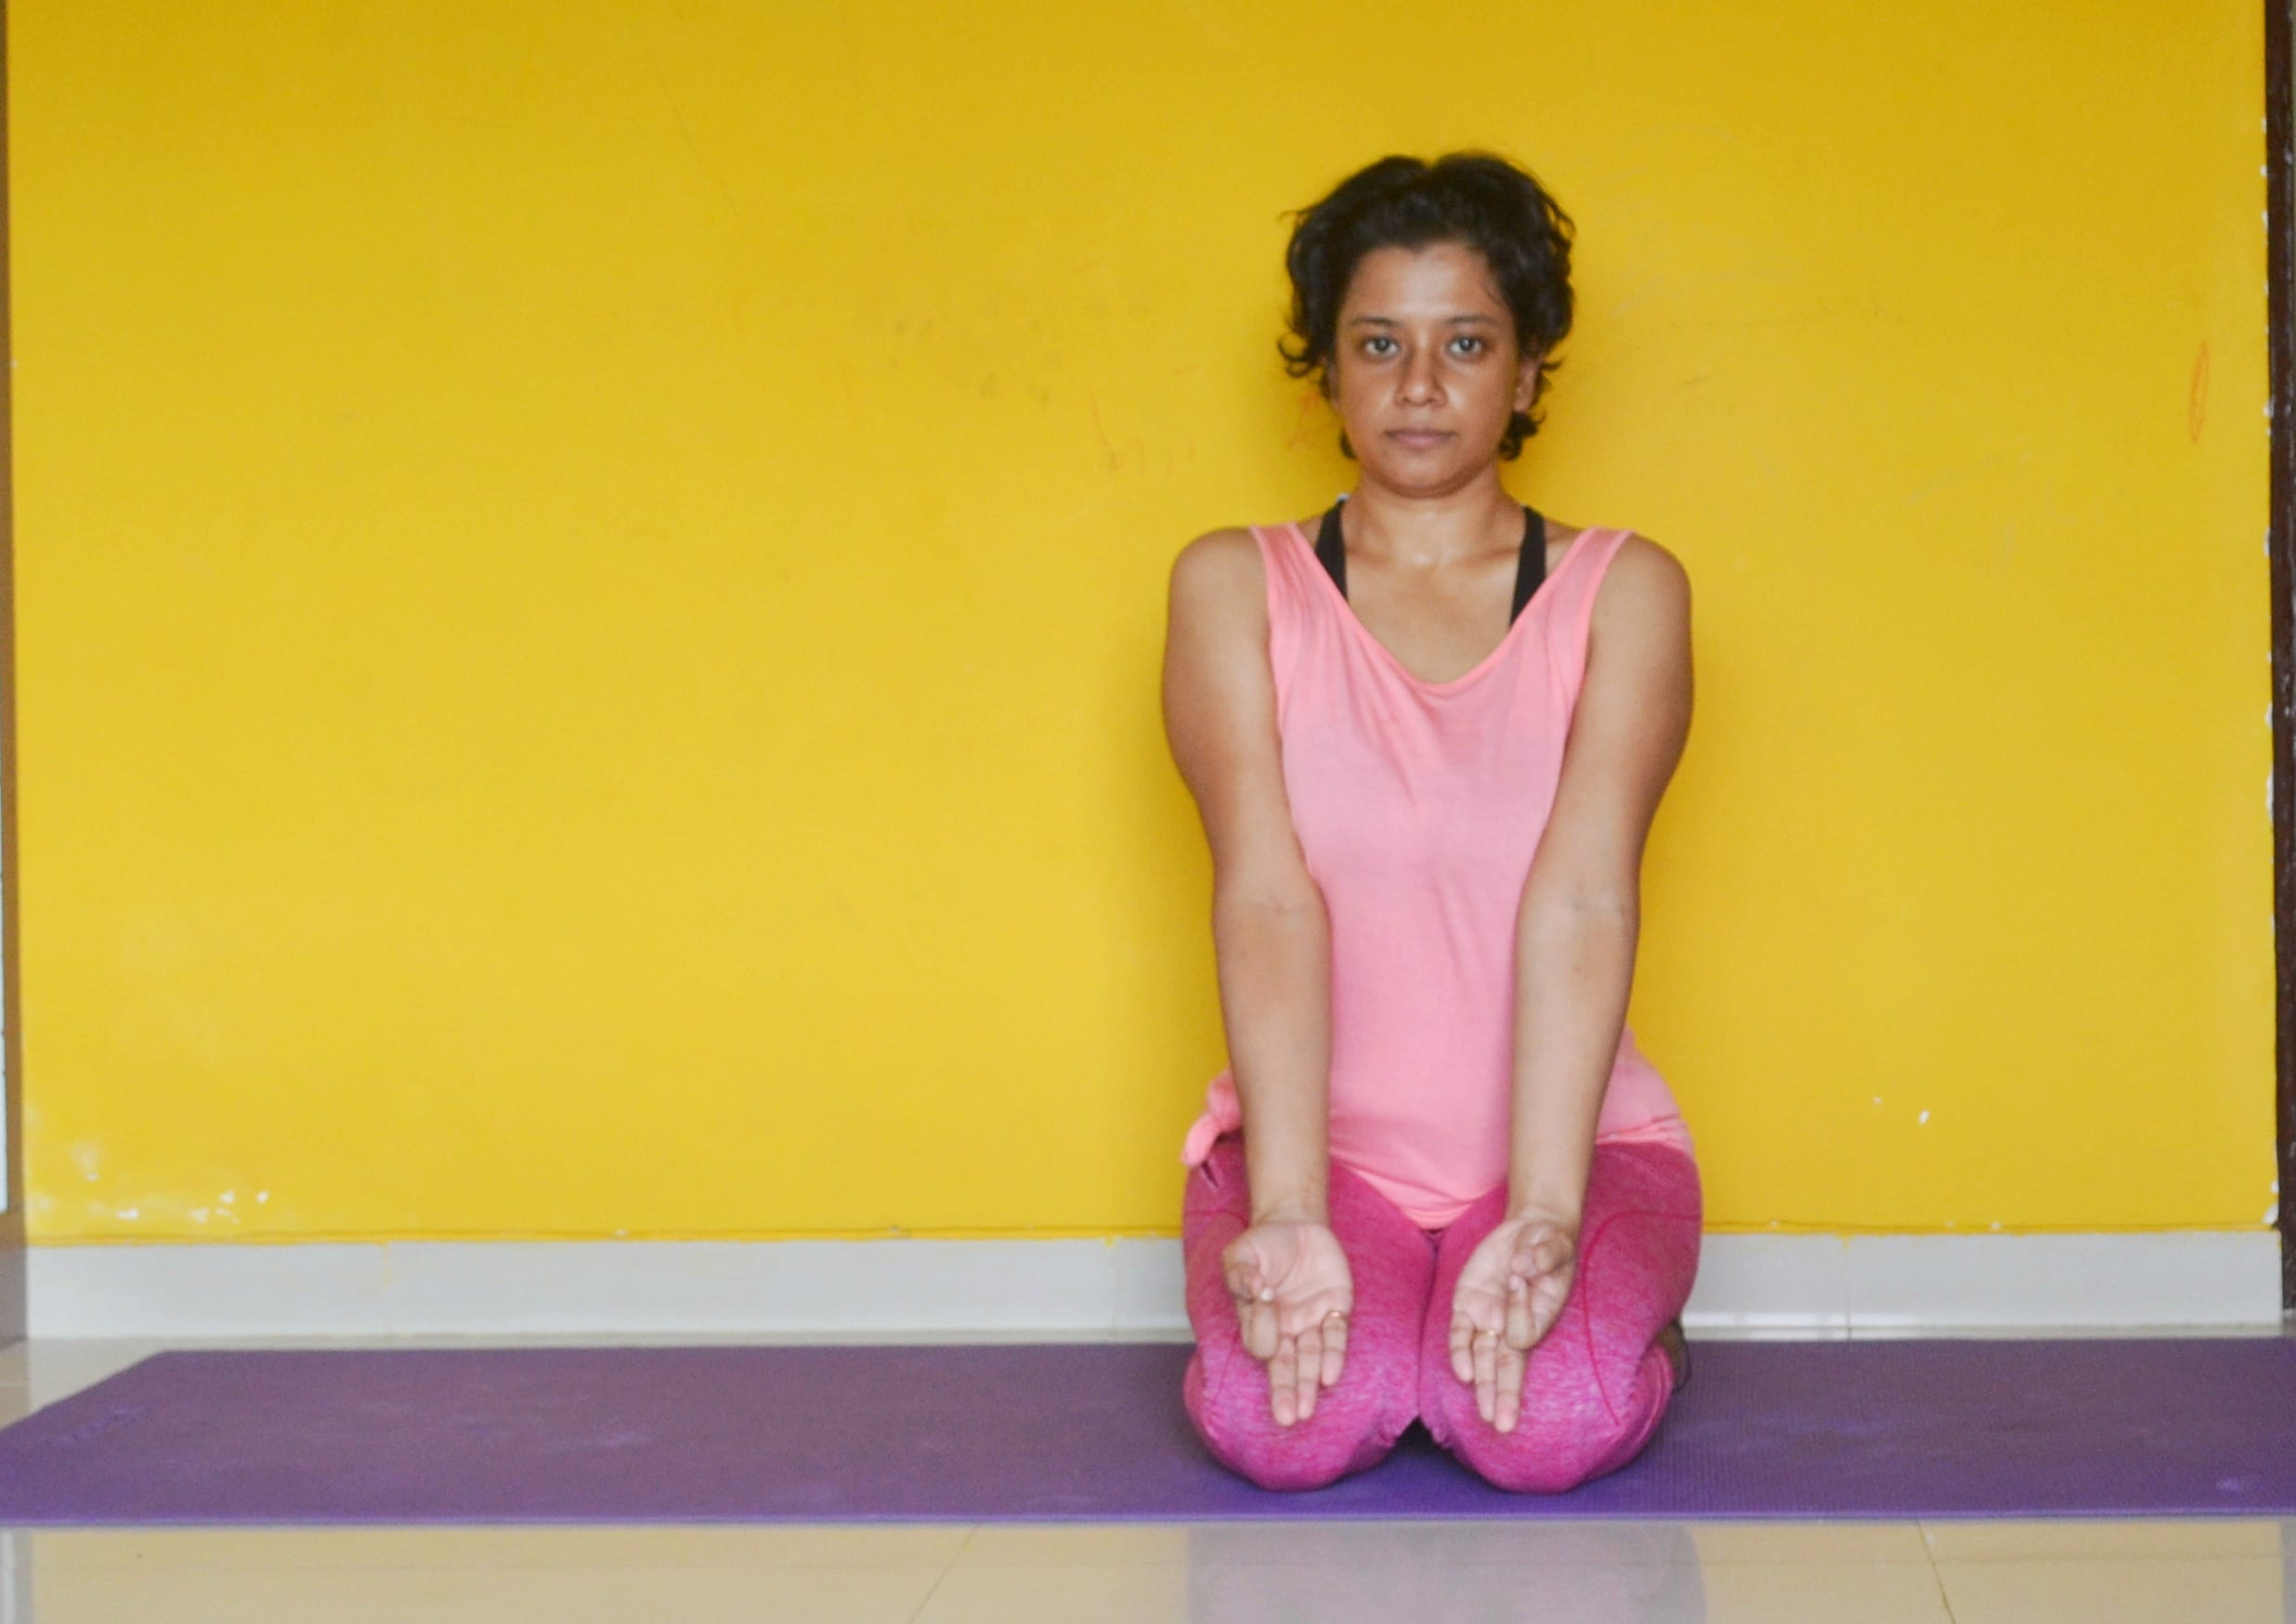
It’s a classical seated yoga posture that stretches thighs and ankles while improving posture. It is one of the most traditional postures effective for breathing exercises. It helps in spinal alignment with slouching posture and allows for better breathing.
Step 1: With your thighs upright to the floor kneel on it and touch your inner knees together. Angle your big toes slightly in toward each other and press the top of each foot evenly on the floor.
Step 2: With your chest leaning slightly forward, exhale and sit back halfway. Wedge your thumbs into the backs of your knees and draw the skin and flesh of the calf muscles toward the heels. Then sit down between your feet.
Step 3: Allow a thumb’s-width space between the inner heels and the outer hips. Turn your thighs inward and press the heads of the thigh bones into the floor with the bases of your palms. Then lay your hands in your lap, one on the other, palms up, or on your thighs, palms down.
Step 4: Stay 30 seconds to 1 minute in the pose at the initial stage and gradually extend it to 5 minutes. Press your hands against the floor and lift your buttocks up, slightly higher than the heels while coming out of the pose. Cross your ankles underneath your buttocks then stretch your legs out in front of you.
2. Supta Virasana (Reclining Hero Pose)

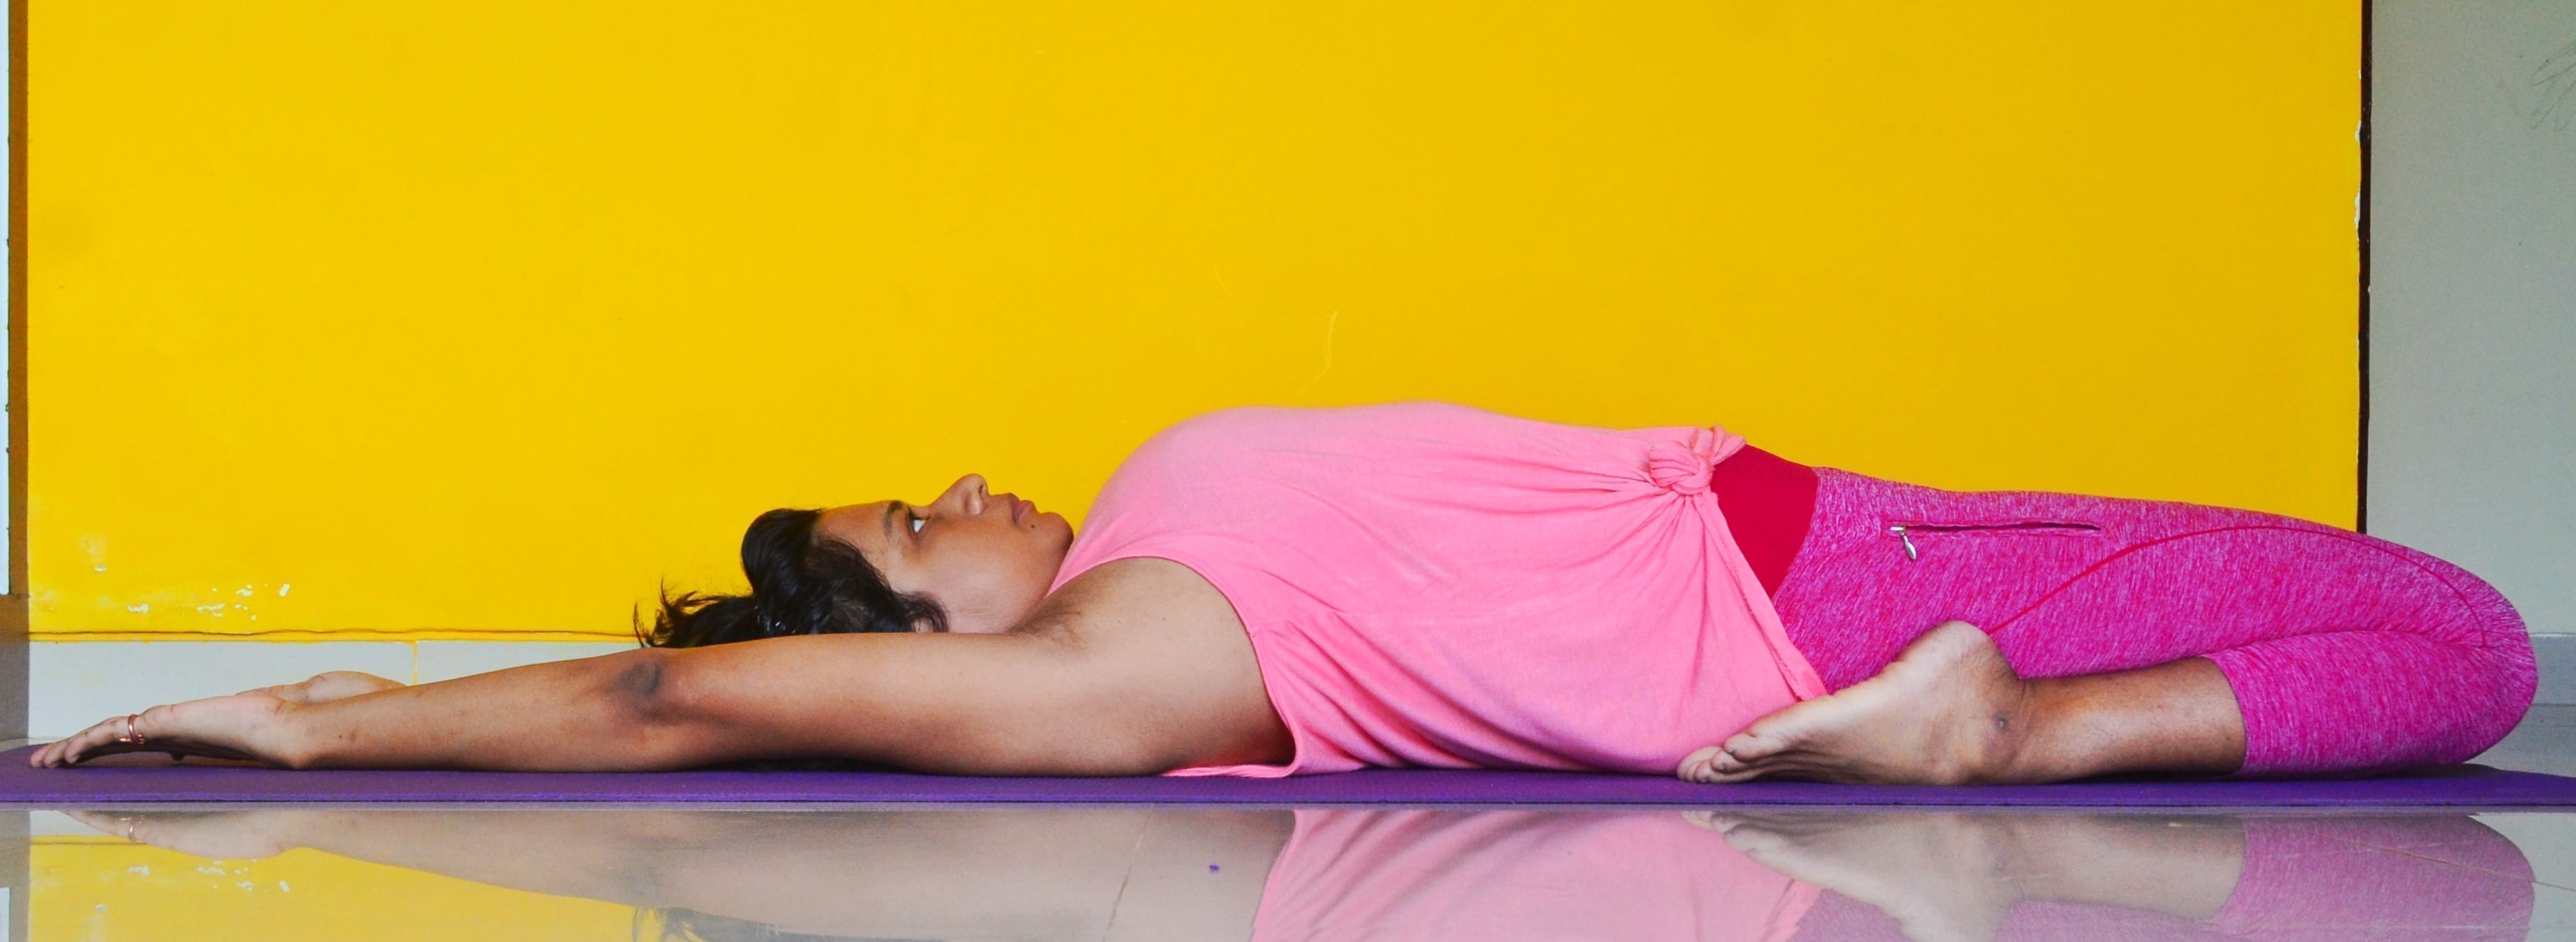
It stretches for the front of the body, including the thighs, lungs, chest, foot, and abdominal muscles. It helps in alleviating digestive problems by massaging the abdominal organs. Other benefits include realignment of rounded shoulder, stimulation of the thyroid and parathyroid glands, toning of spinal nerve and makes the back flexible. Regular practices of Supta Virasana will Increase the elasticity of lung tissue.
Step 1: Placing the palms on the floor beside the buttocks, slowly bend back, placing the right forearm and the elbow on the ground and then the left.
Step 2: Bring the back of your head to the ground while arching the back.Place the hands on the thighs.If necessary, separate the knees, avoid overstraining the muscles or legs.
Step 3: Breathing in and taking the support of the elbows and the arms raise the head above the ground.Then shift the body weight on the left arm and elbow by sliding the body, then slowly coming to the starting position. Gradually increase the time of the process from 3-5 times to 8-10 times.
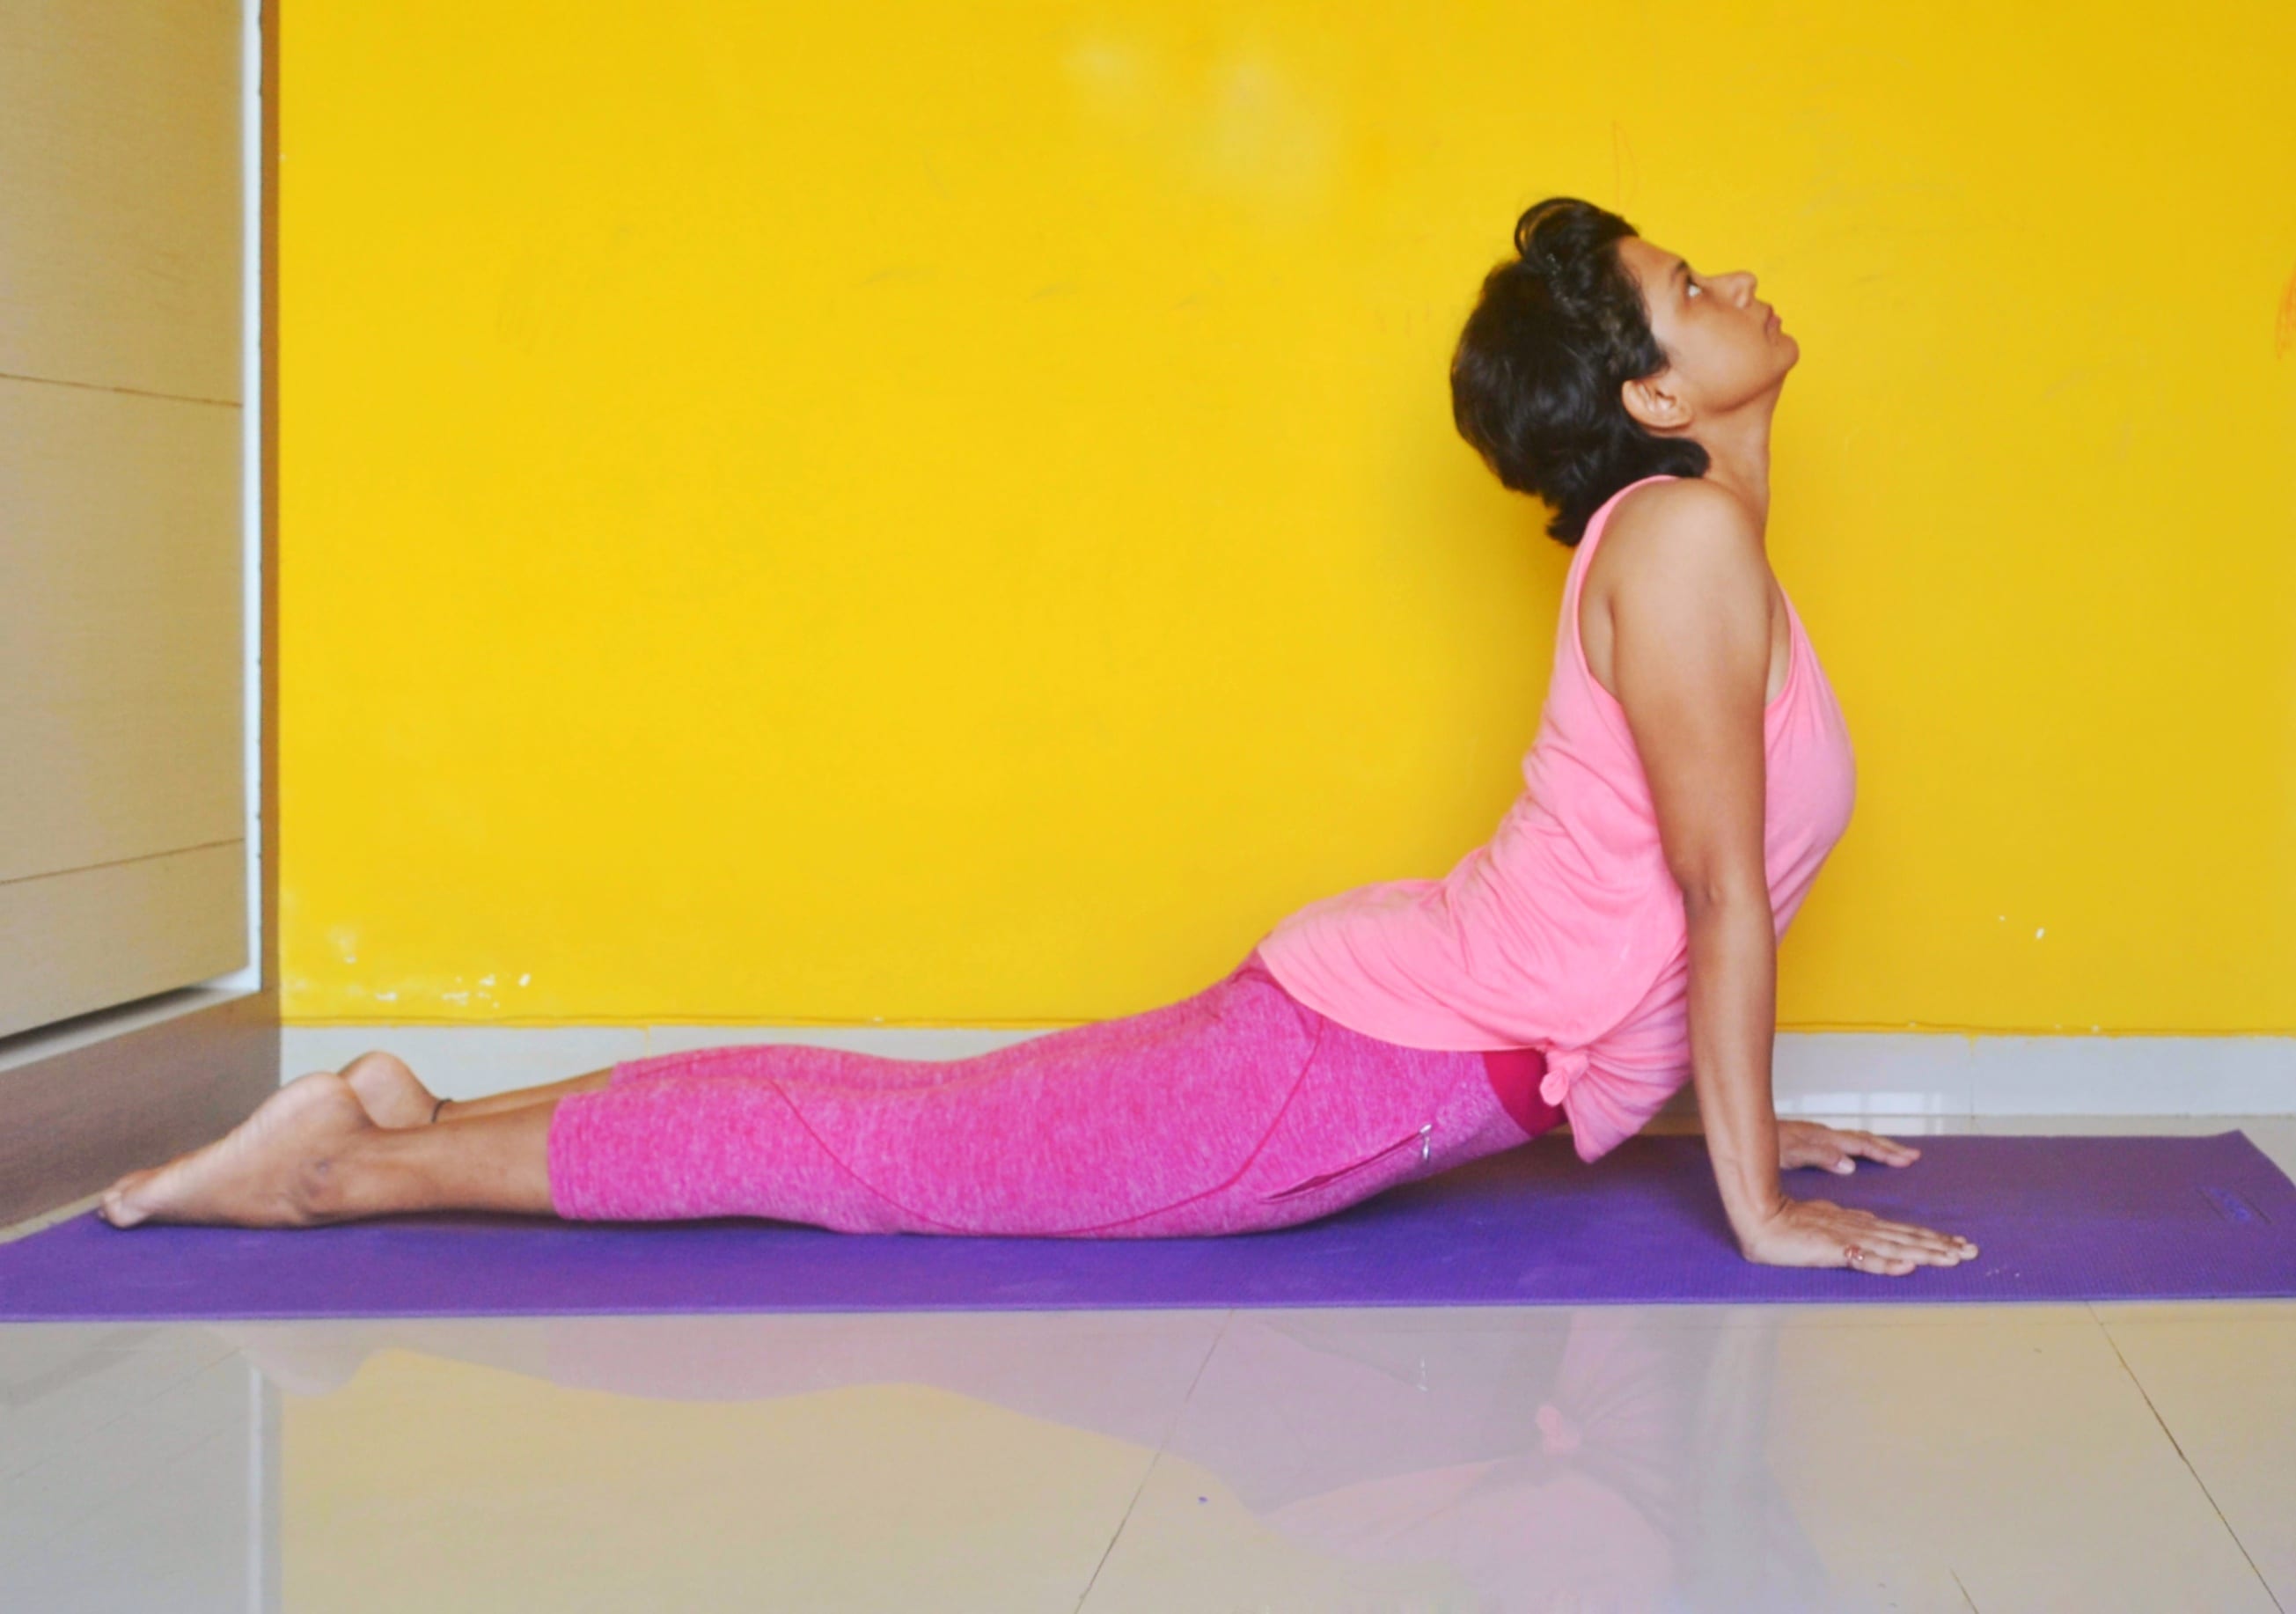
3. Urdhva Mukha Svanasana (Upward Facing Dog Pose)
It helps relieve the tension in lungs, shoulders, chest and buttocks. It is a great remedy for sciatica, depression, fatigue and asthma. It helps in strengthening the spine, arm and wrist as most of the body weight is borne by them. It also stretches the back and relieves the body of lower back ache.
Step 1: With your belly towards the floor, lie flat on the ground. The arms must be placed beside the body with feet faced downwards. Gently fold your elbows. Place your palms next to your lowest rib.
Step 2: Press your hands on the mat as you gently lift your knees, hips, and chest off the mat. Your body weight must be spread across the top of your feet and your palms. Look ahead, slightly tilting your head backward.
Step 3: Hold the pose for 30 seconds to 1 min. While coming back to the starting position, slowly lower your knees, hips and torso back on the mat.
4. Bhramari Pranayama (Humming Bee Breath)

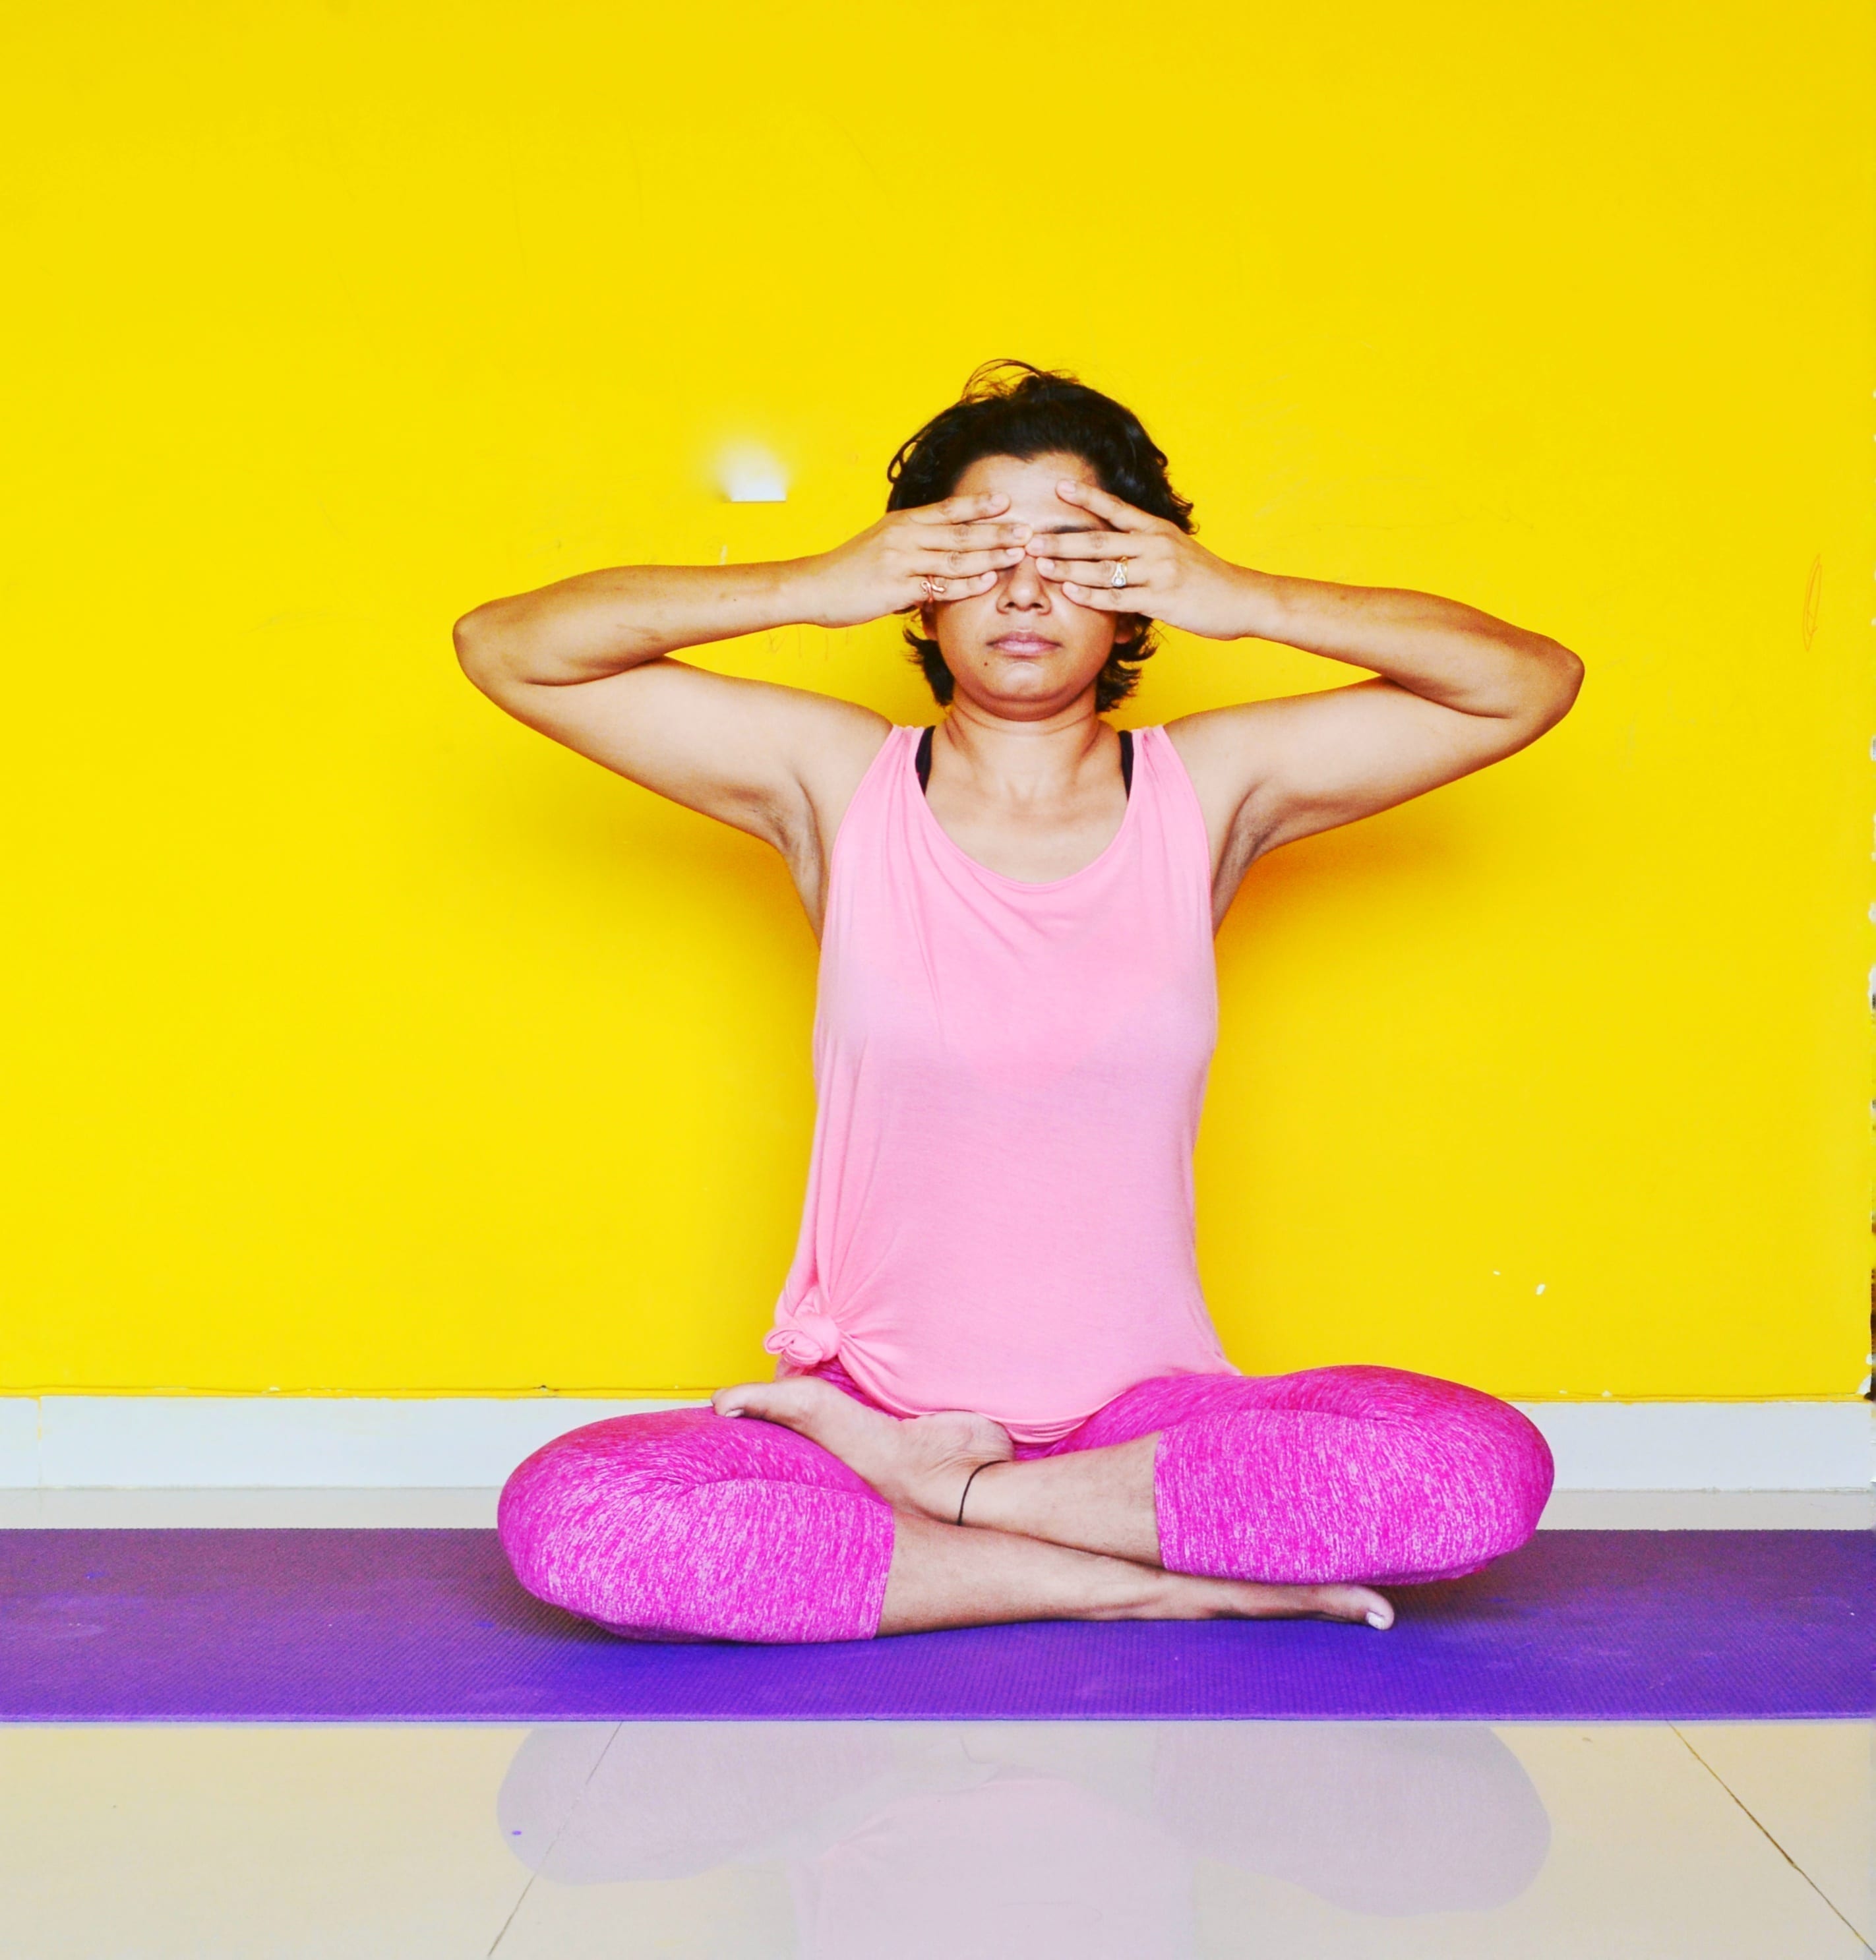
The first step towards self-healing is breathing and understanding the technique affects positively on our thoughts and moods. This pranayama teaches to keep our breath still so that we can stabilise and de-stress our mind.
Step 1: Sit cross-legged or toward the front of the chair, keep the spine straight. Close your eyes and keep your lips and your teeth slightly apart.
Step 2: Bring your thumbs to your ears, and gently close them. The other fingers will rest on the crown. Breathe in slowly through your nose, and then exhale slowly with a low-pitched ‘hmmm’ sound at the back of your throat. You will be able to feel a vibration resonate through your head once you are going in deep. Repeat it at least 10 times, sit silently in that position for five to ten minutes.
5. Matsyasana (Fish Pose / Reclining Back-Bending Pose)

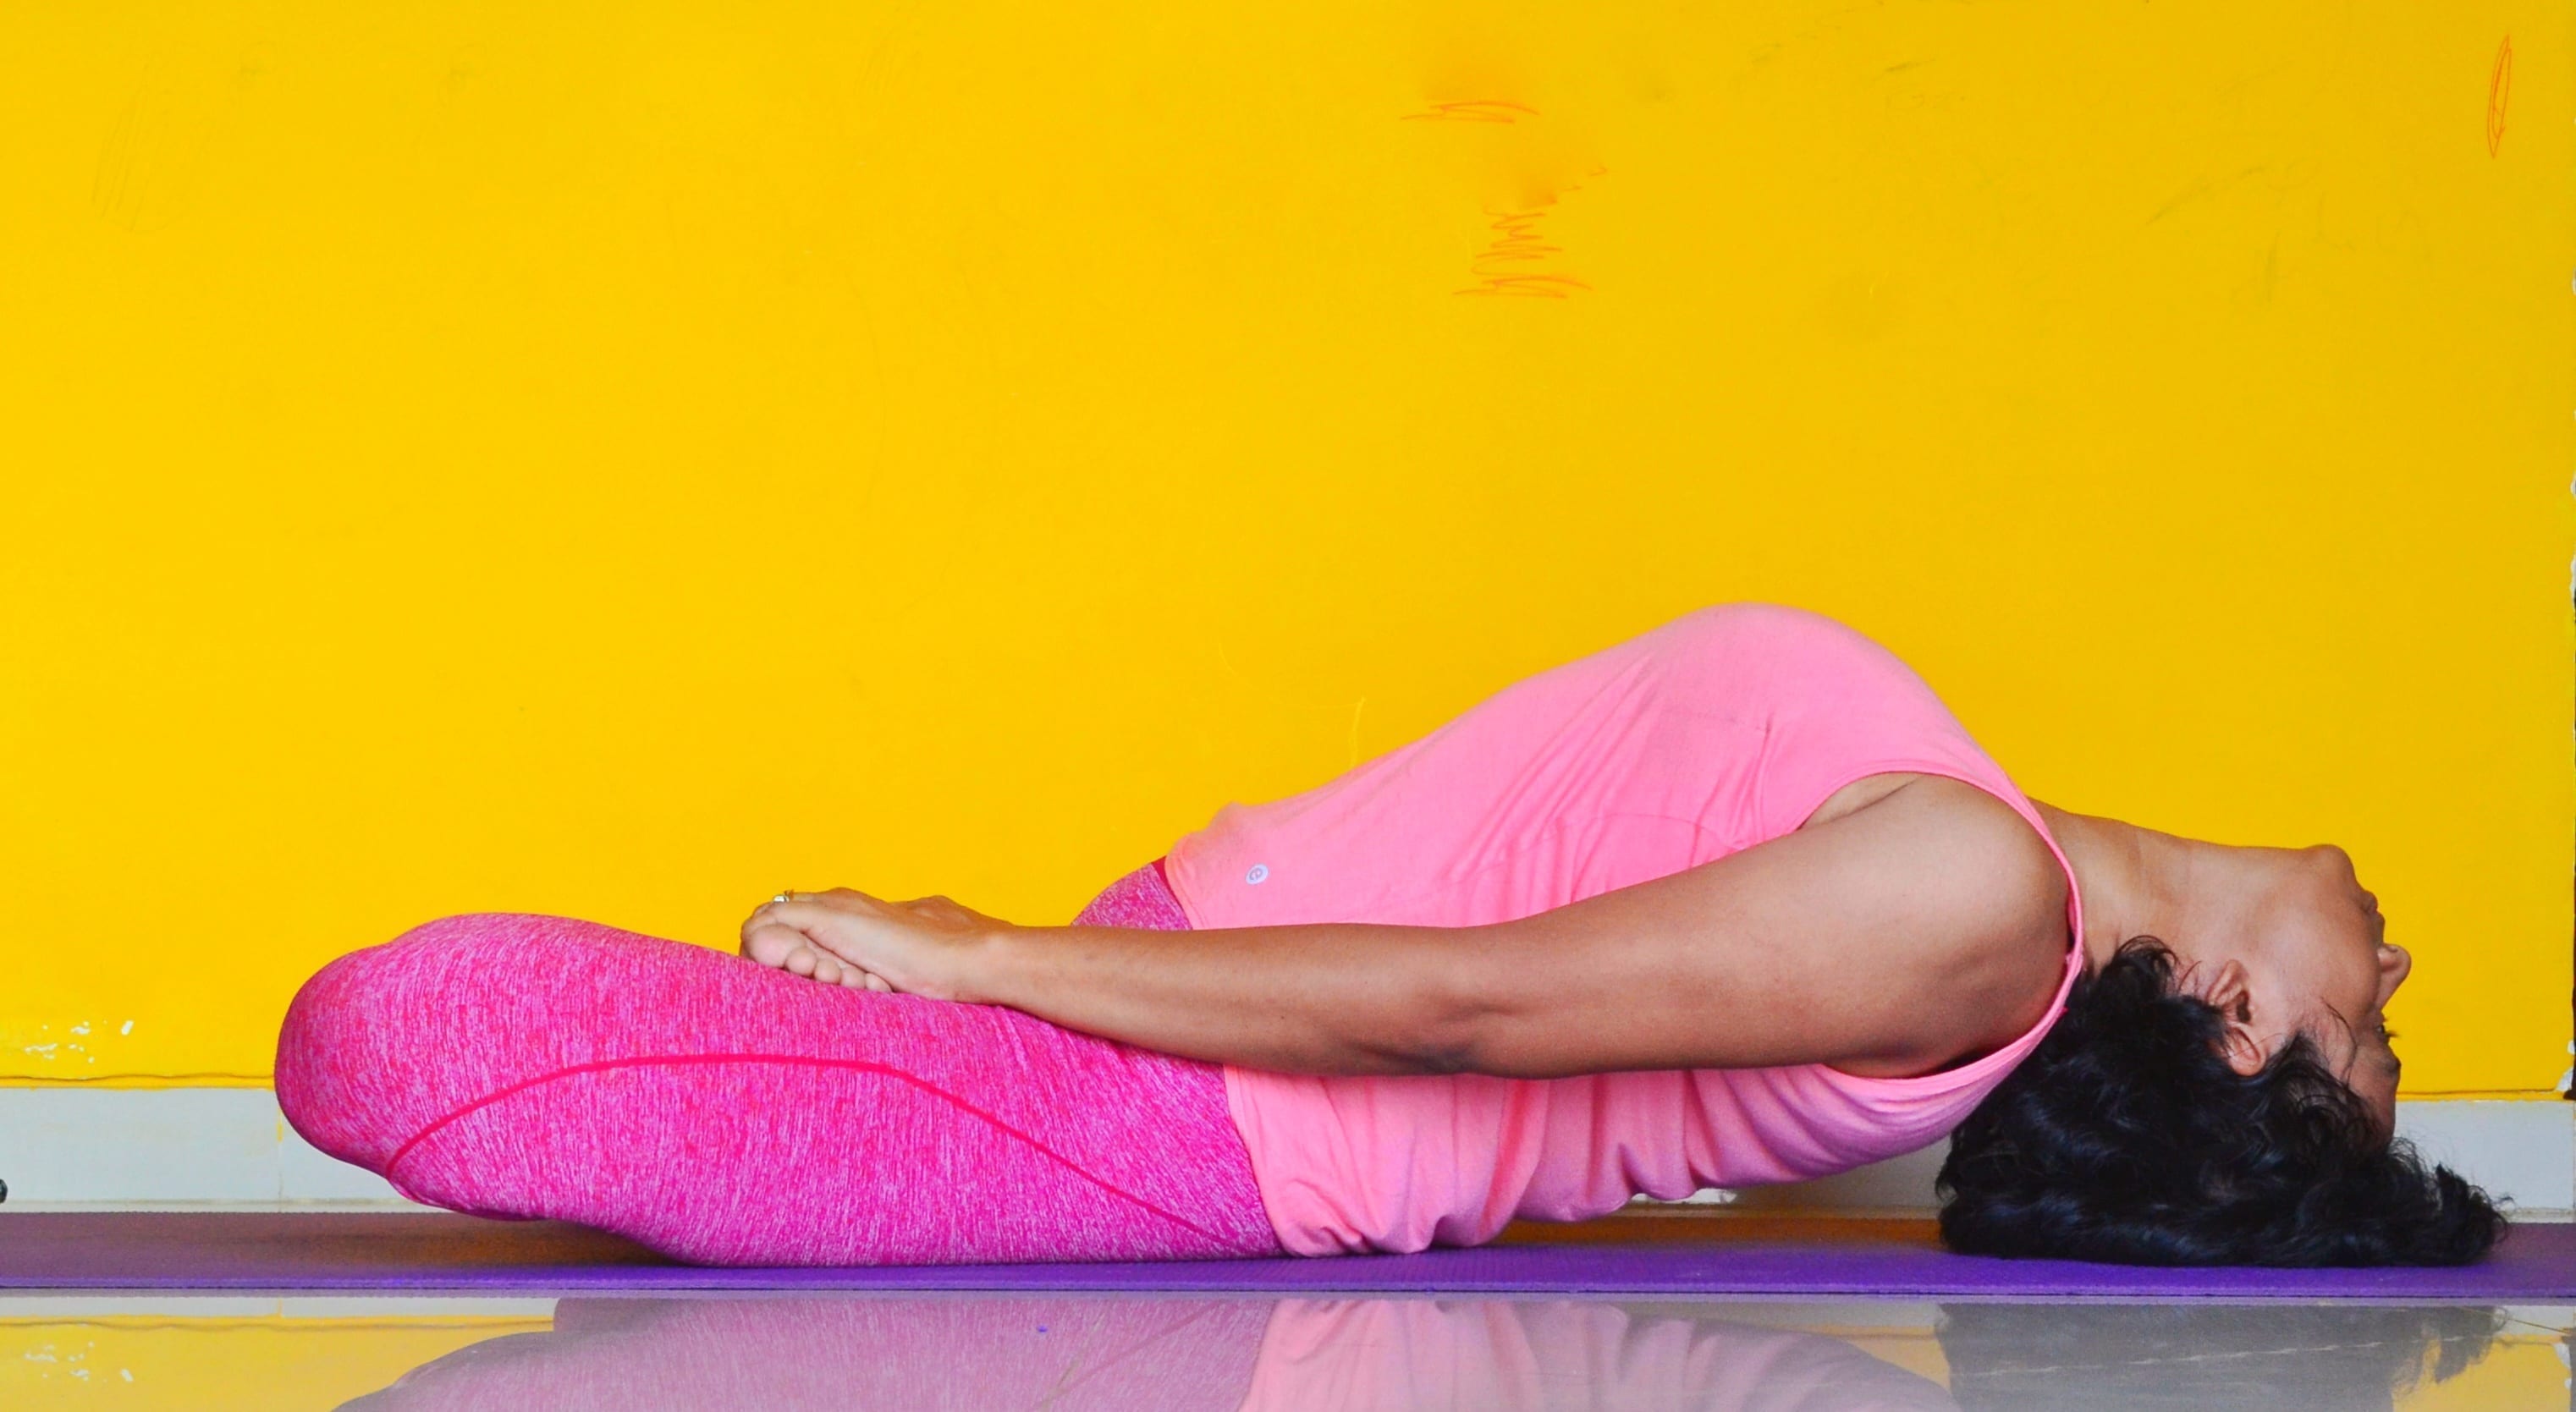
It is also known as the destroyer of all kinds of diseases. It can stimulate the spine, rib cage as well as the lungs, thereby relieving signs of fatigue and anxiety. The dorsal region and the torso are fully expanded hence, breathing becomes fuller.
Step 1: Traditionally it is performed with the legs in Padmasana but here we’ll work either with the knees bent, feet on the floor, or with the legs straight pressed against the floor. Be sure to tuck your forearms and elbows up close to the sides of your torso.
Step 2: Take the support of your forearms and elbows, lower slowly your body while placing the crown of your head gently on the floor. Try to arch the back to ensure that you hold your feet with your hands. Close your eyes and relax your body with gentle deep and slow breaths. Hold in this pose at least for 30 seconds. Practice this by interchanging the position of your legs.
6. Bhujangasana (Cobra Pose)

It has proven to be beneficial for people with respiratory disorders. It requires an active process of inhalation and exhalation; therefore, it helps the lungs to remain constantly ventilated and the blood oxygenated.
Step 1: Lie on the stomach with feet flat on the floor and forehead resting on the ground. Keep your legs close together and palms downwards under your shoulders, keeping your elbows parallel and close to your torso.
Step 2: Taking a deep breath in, slowly lift your head, chest and abdomen while keeping your navel on the floor. Pull your torso back and off the floor with the support of your hands. If possible, straighten your arms by arching your back as much as possible, tilt your head back and look up.
Step 3: While coming back to the starting position, breathe out gently and bring your abdomen, chest and head back to the floor.
7. Virabhadrasana (Warrior Pose)

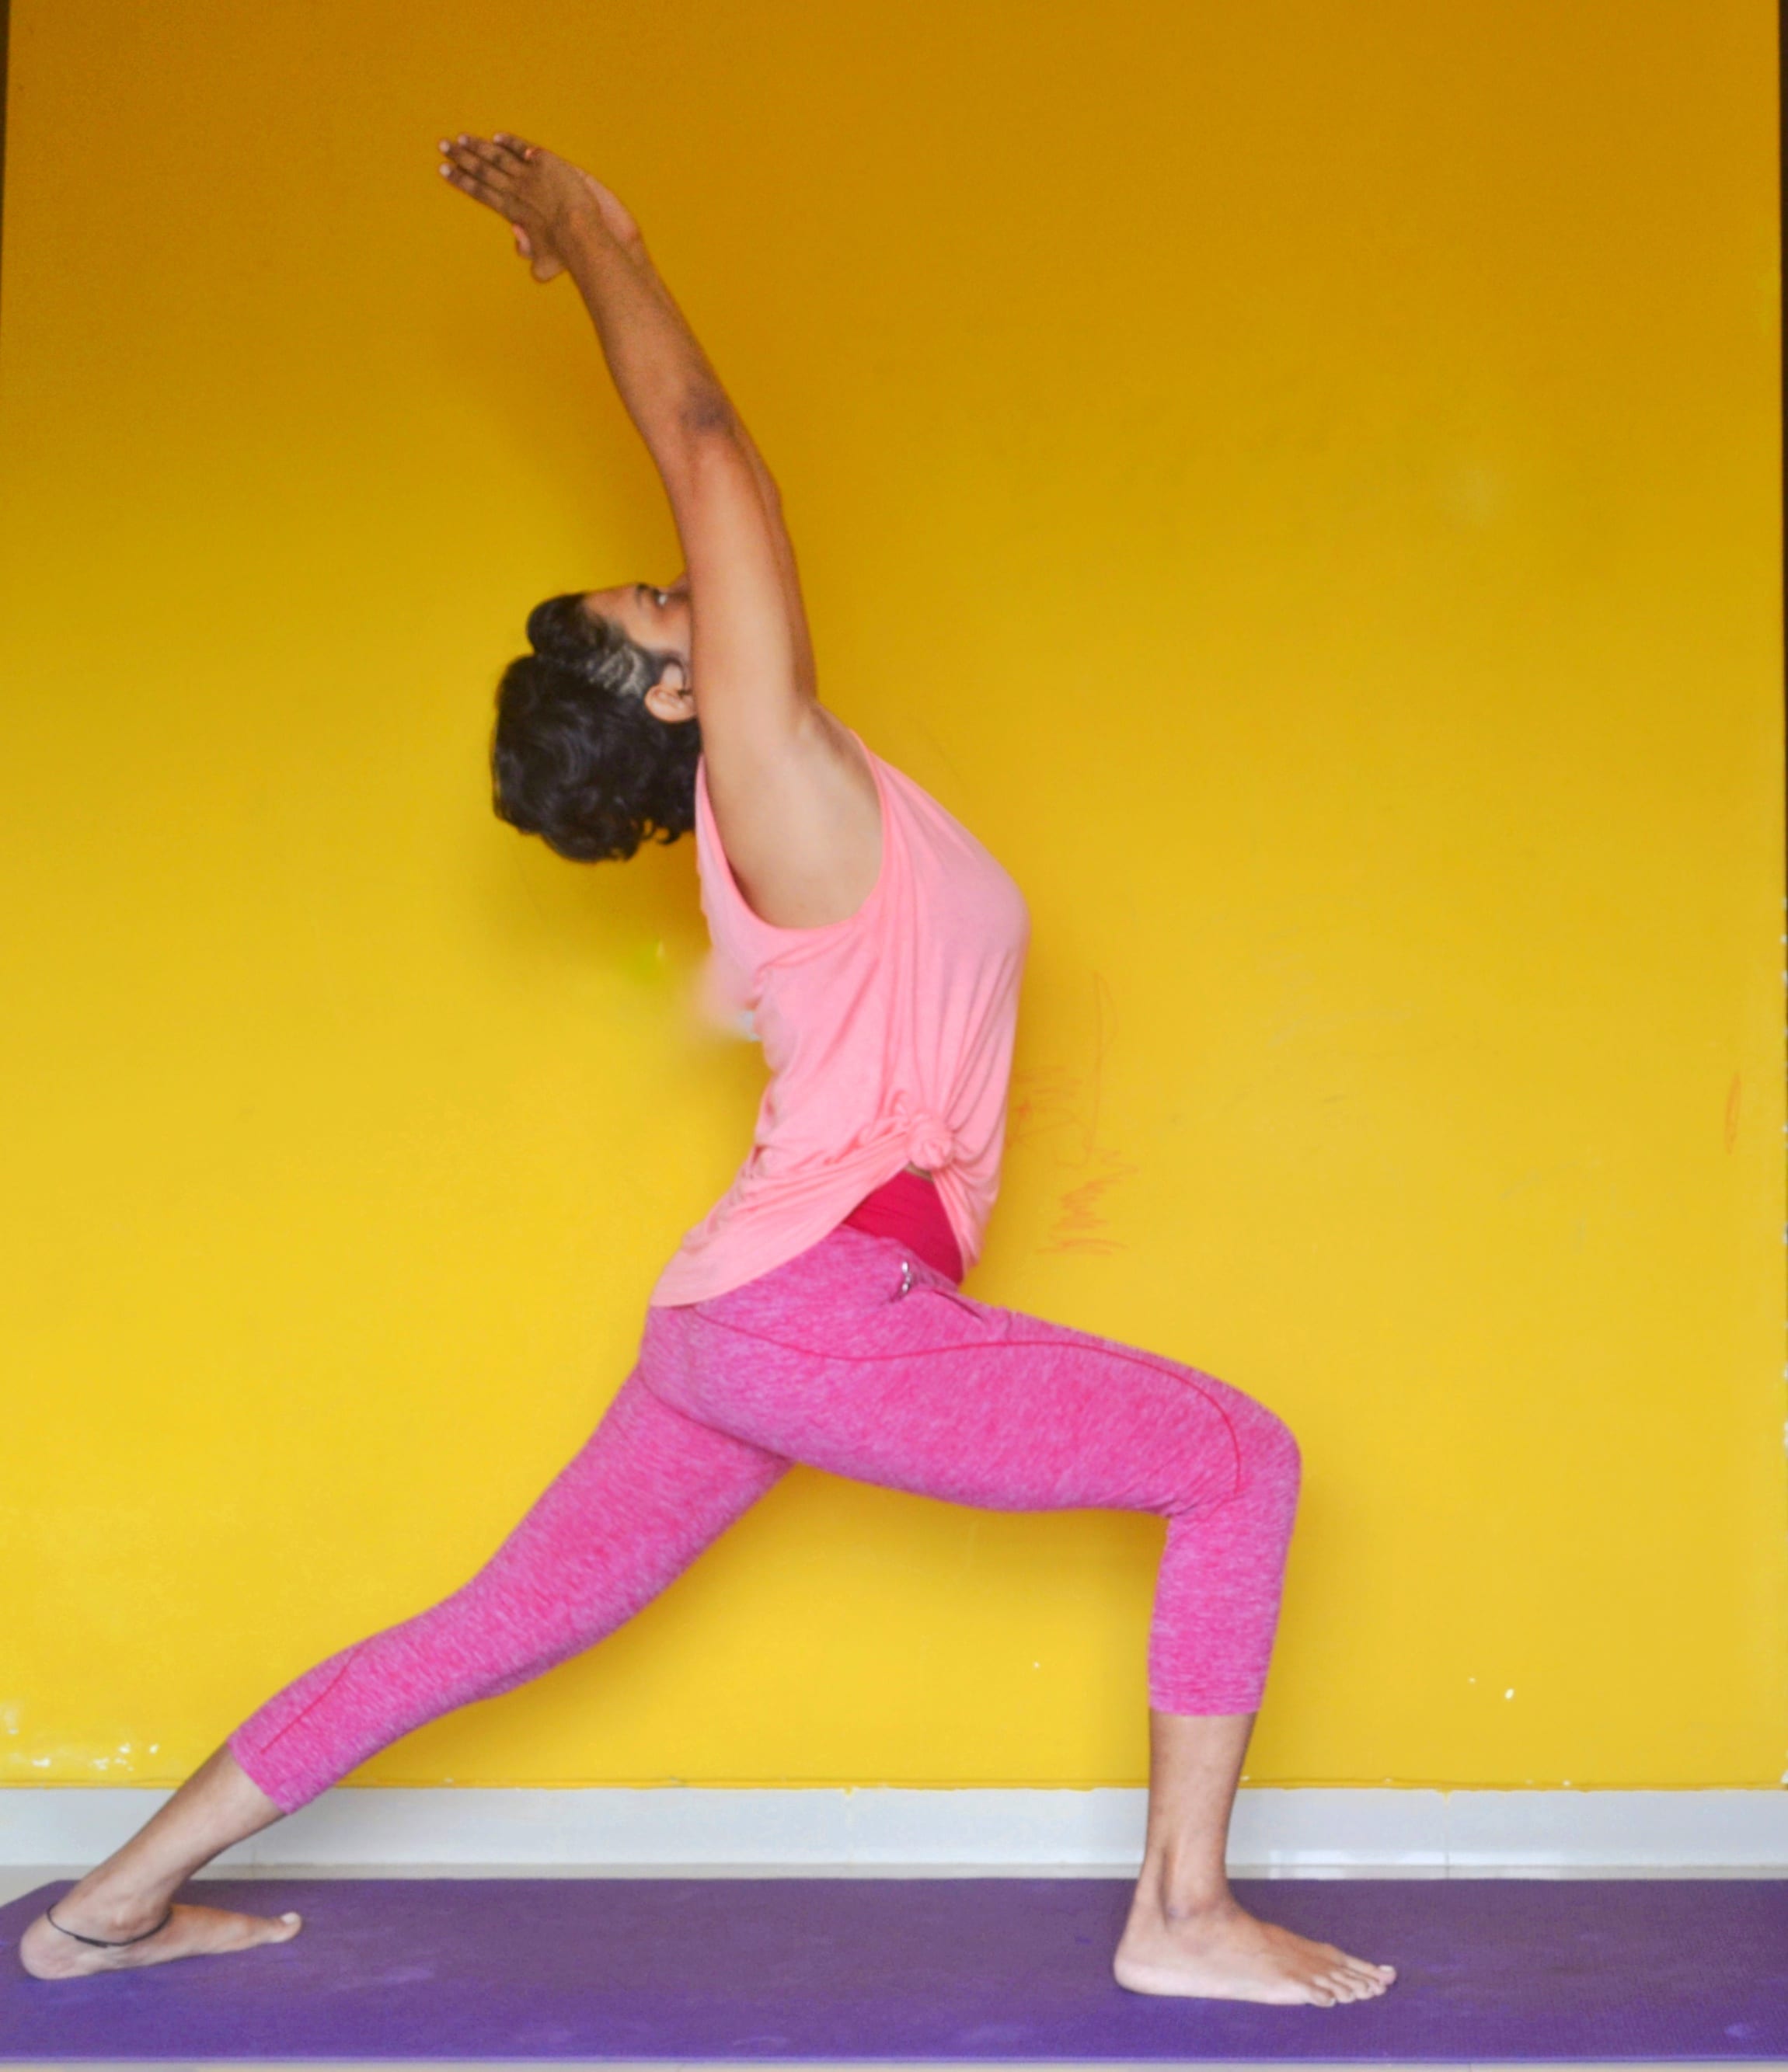
It was named after Veerabhadra, a fierce warrior and an incarnation of Lord Shiva. It helps in strengthening the arms, shoulders, thighs and back muscles. Opens the chest cavity, improving the elasticity of the lungs.
Step 1: Stand straight with your legs wide open. Turn your right foot out by 90 degrees and left foot in by about 15 degrees. Lift both arms sideways to shoulder height with your palms facing upwards. Bend your right knee while breathing out.
Step 2: Turn your head and look to your right. As you settle down in the posture, stretch your arms. Hold the posture and keep breathing as you go down. Bring your hands down from the sides. Repeat it for the other side of your body.
8. Utthita Trikonasana (Triangle Pose)

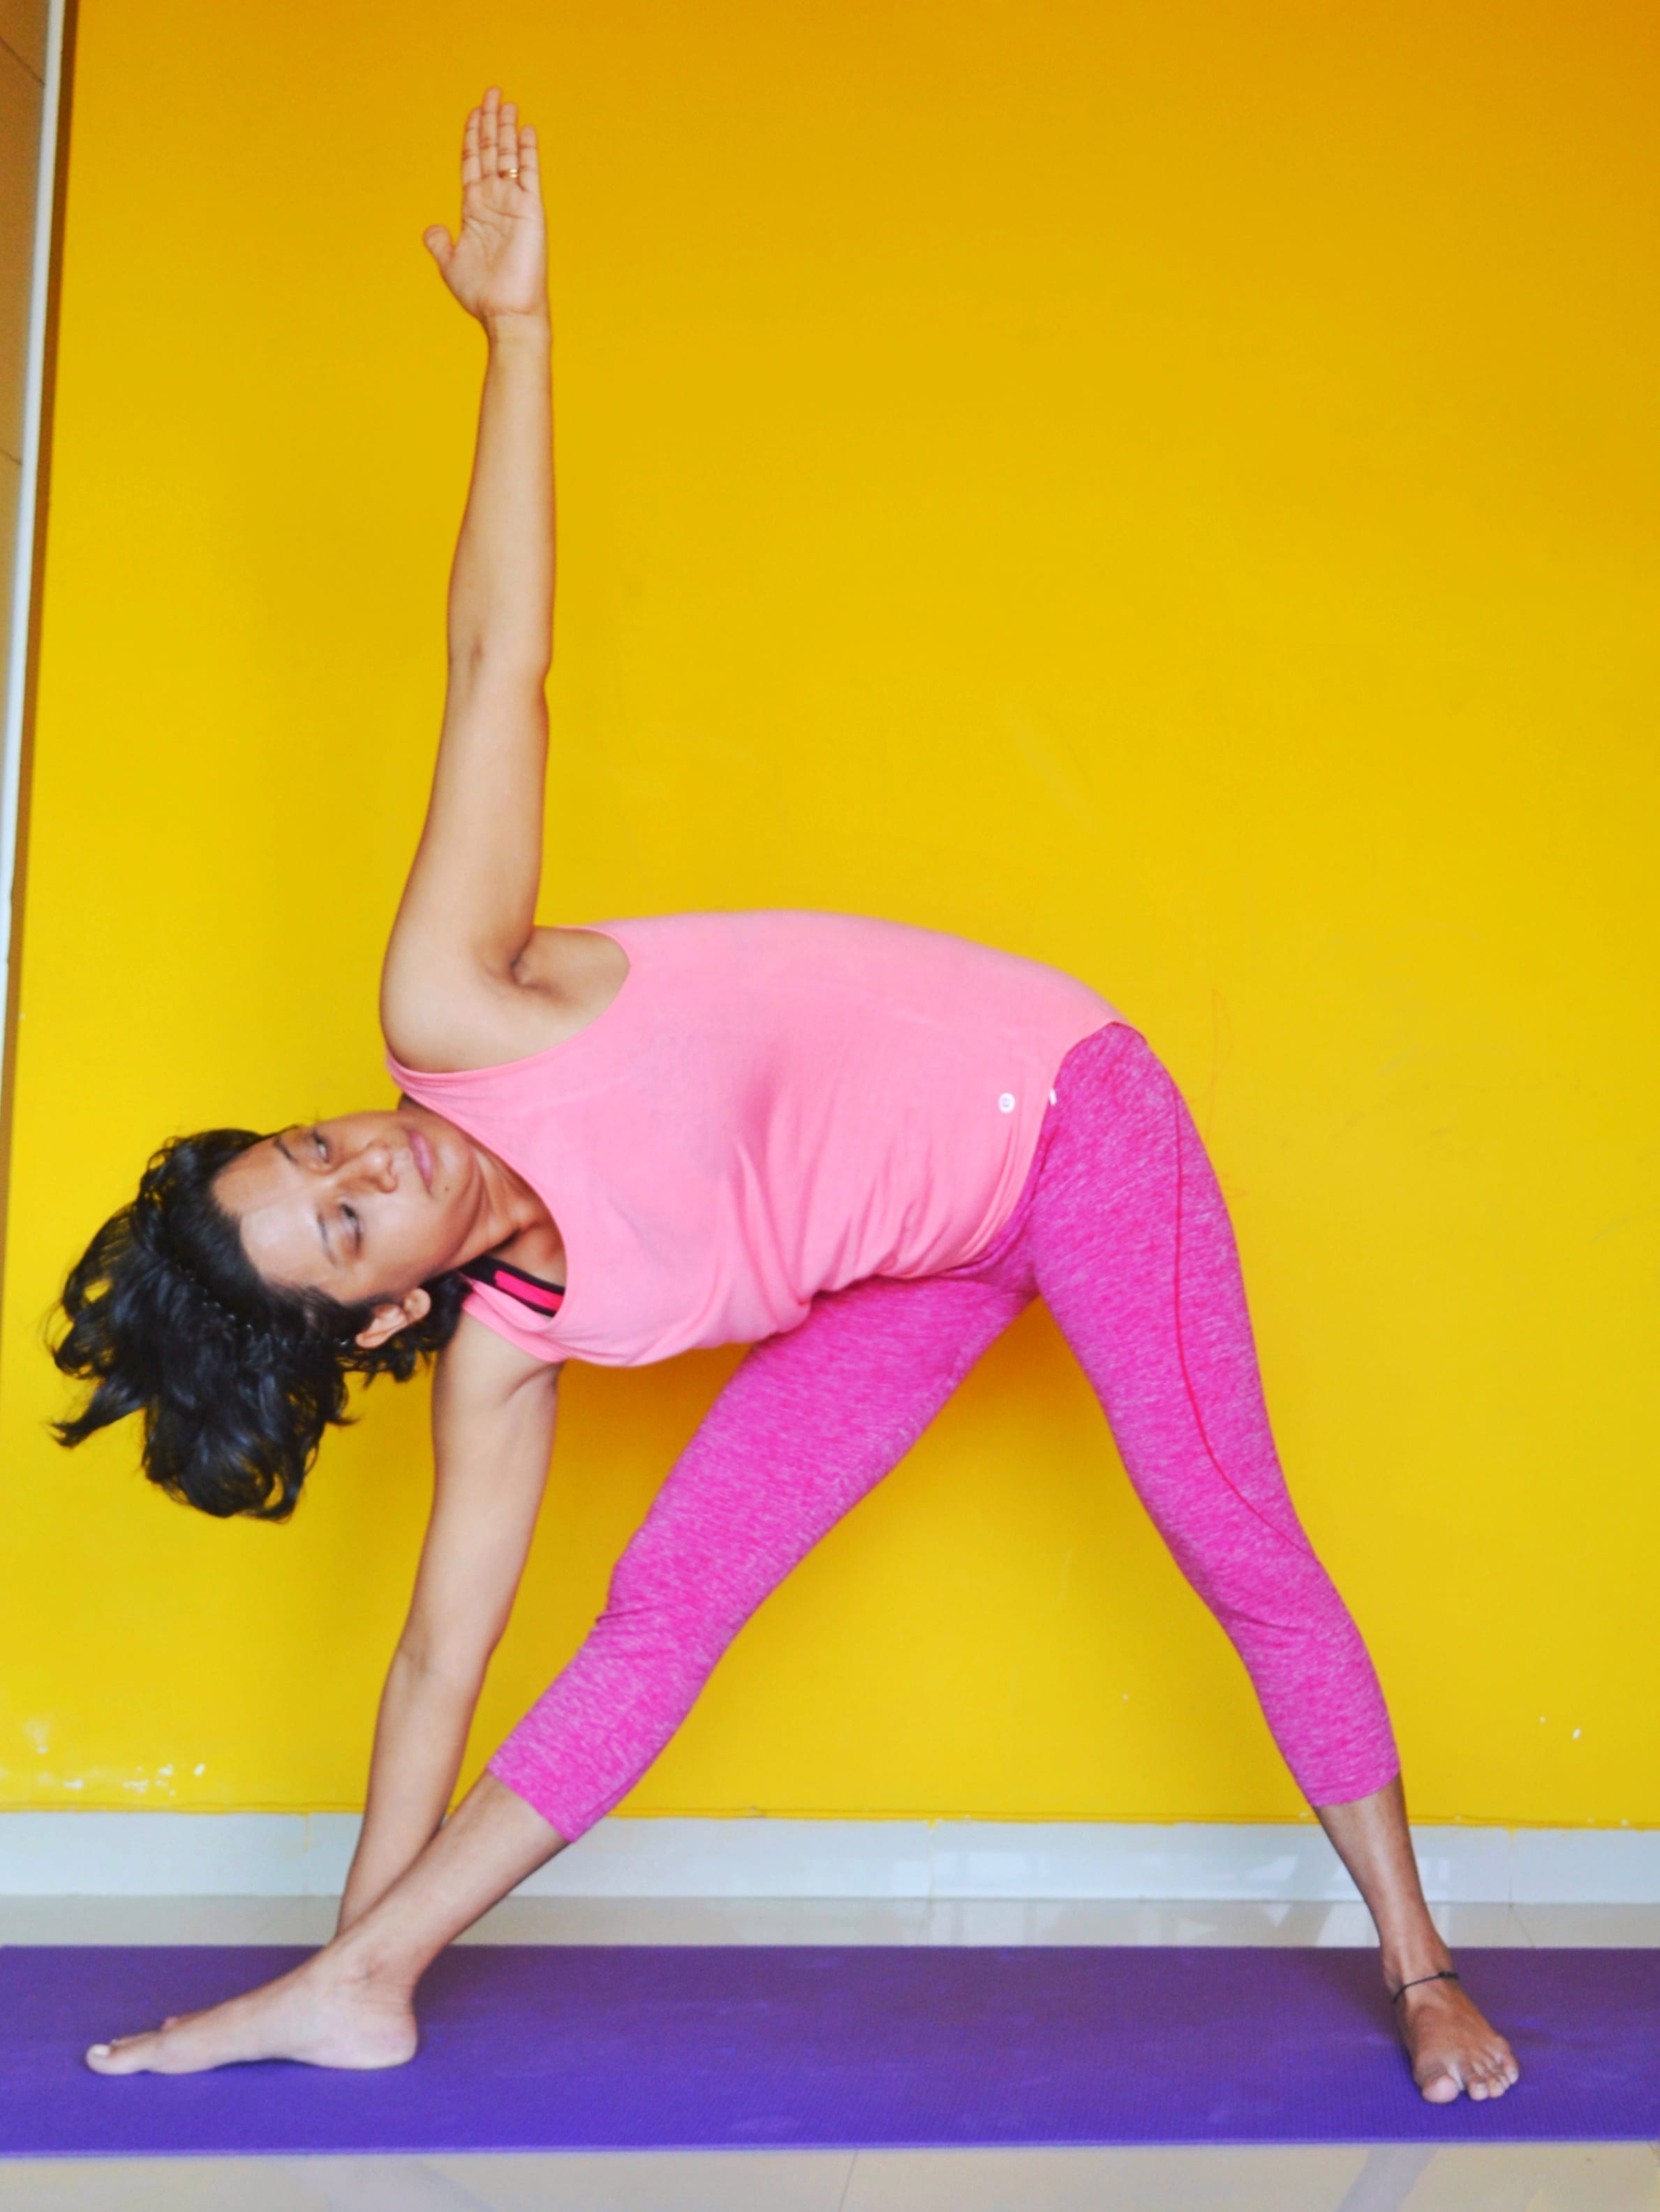
It is the very first asana when practising yoga. A classic standing posture that helps in stretching the entire body. It helps in opening your chest, lungs and heart. Conscious equilibrium to the body and mind.
Step 1: With an exhalation, step or lightly jump your feet 3 to 4 feet apart. Raise your arms parallel to the floor and reach them actively out to the sides, shoulder blades wide, palms down.
Step 2: Turn your left foot in to the right and your right foot out to the right 90 degrees. Align the right heel with the left heel. Firm your thighs and turn your right thigh outward.
Step 3: Exhale and extend your torso to the right directly over the plane of the right leg, bending from the hip joint, not the waist. Rotate the torso to the left, keeping the two sides equally long. Let the left hip come slightly forward and lengthen the tailbone toward the back heel.
Step 4: Rest your right hand on your shin, ankle, or the floor outside your right foot. Stretch your left arm toward the ceiling, in line with the tops of your shoulders. Keep your head in a neutral position or turn it to the left, eyes gazing softly at the left thumb.
Step 5: Stay in this pose for 30 seconds to 1 minute. Inhale to come up, strongly pressing the back heel into the floor and reaching the top arm toward the ceiling. Reverse the feet and repeat for the same length of time to the left.
9. Kapalbhati (Breath Of Fire)


It helps to cleanse the lungs, sinuses, and respiratory system. Regular practice strengthens the diaphragm and abdominal muscles.
Step 1: Sit in a comfortable position with the spine straight and abdomen not compressed. Sit on your heels, with your knees bent and tucked beneath your thighs. Rest your hands on your knees, palms facing down. You can place your hands, one on top of the other, on your lower belly rather than on your knees.
Step 2: Inhale through both nostrils deeply, use hands to gently press on the lower belly, forcing out the breath in a short burst. As you quickly release the contraction, your inhalation should be automatic and passive.
Step 3: Aim for 65-70 contractions per minute and gradually quicken the pace, aiming for 95-105 cycles per minute. After one minute of the exercise, inhale deeply through the nostrils, and then exhale slowly through your mouth.
10. Nadi Shodhana (Alternate Breathing)

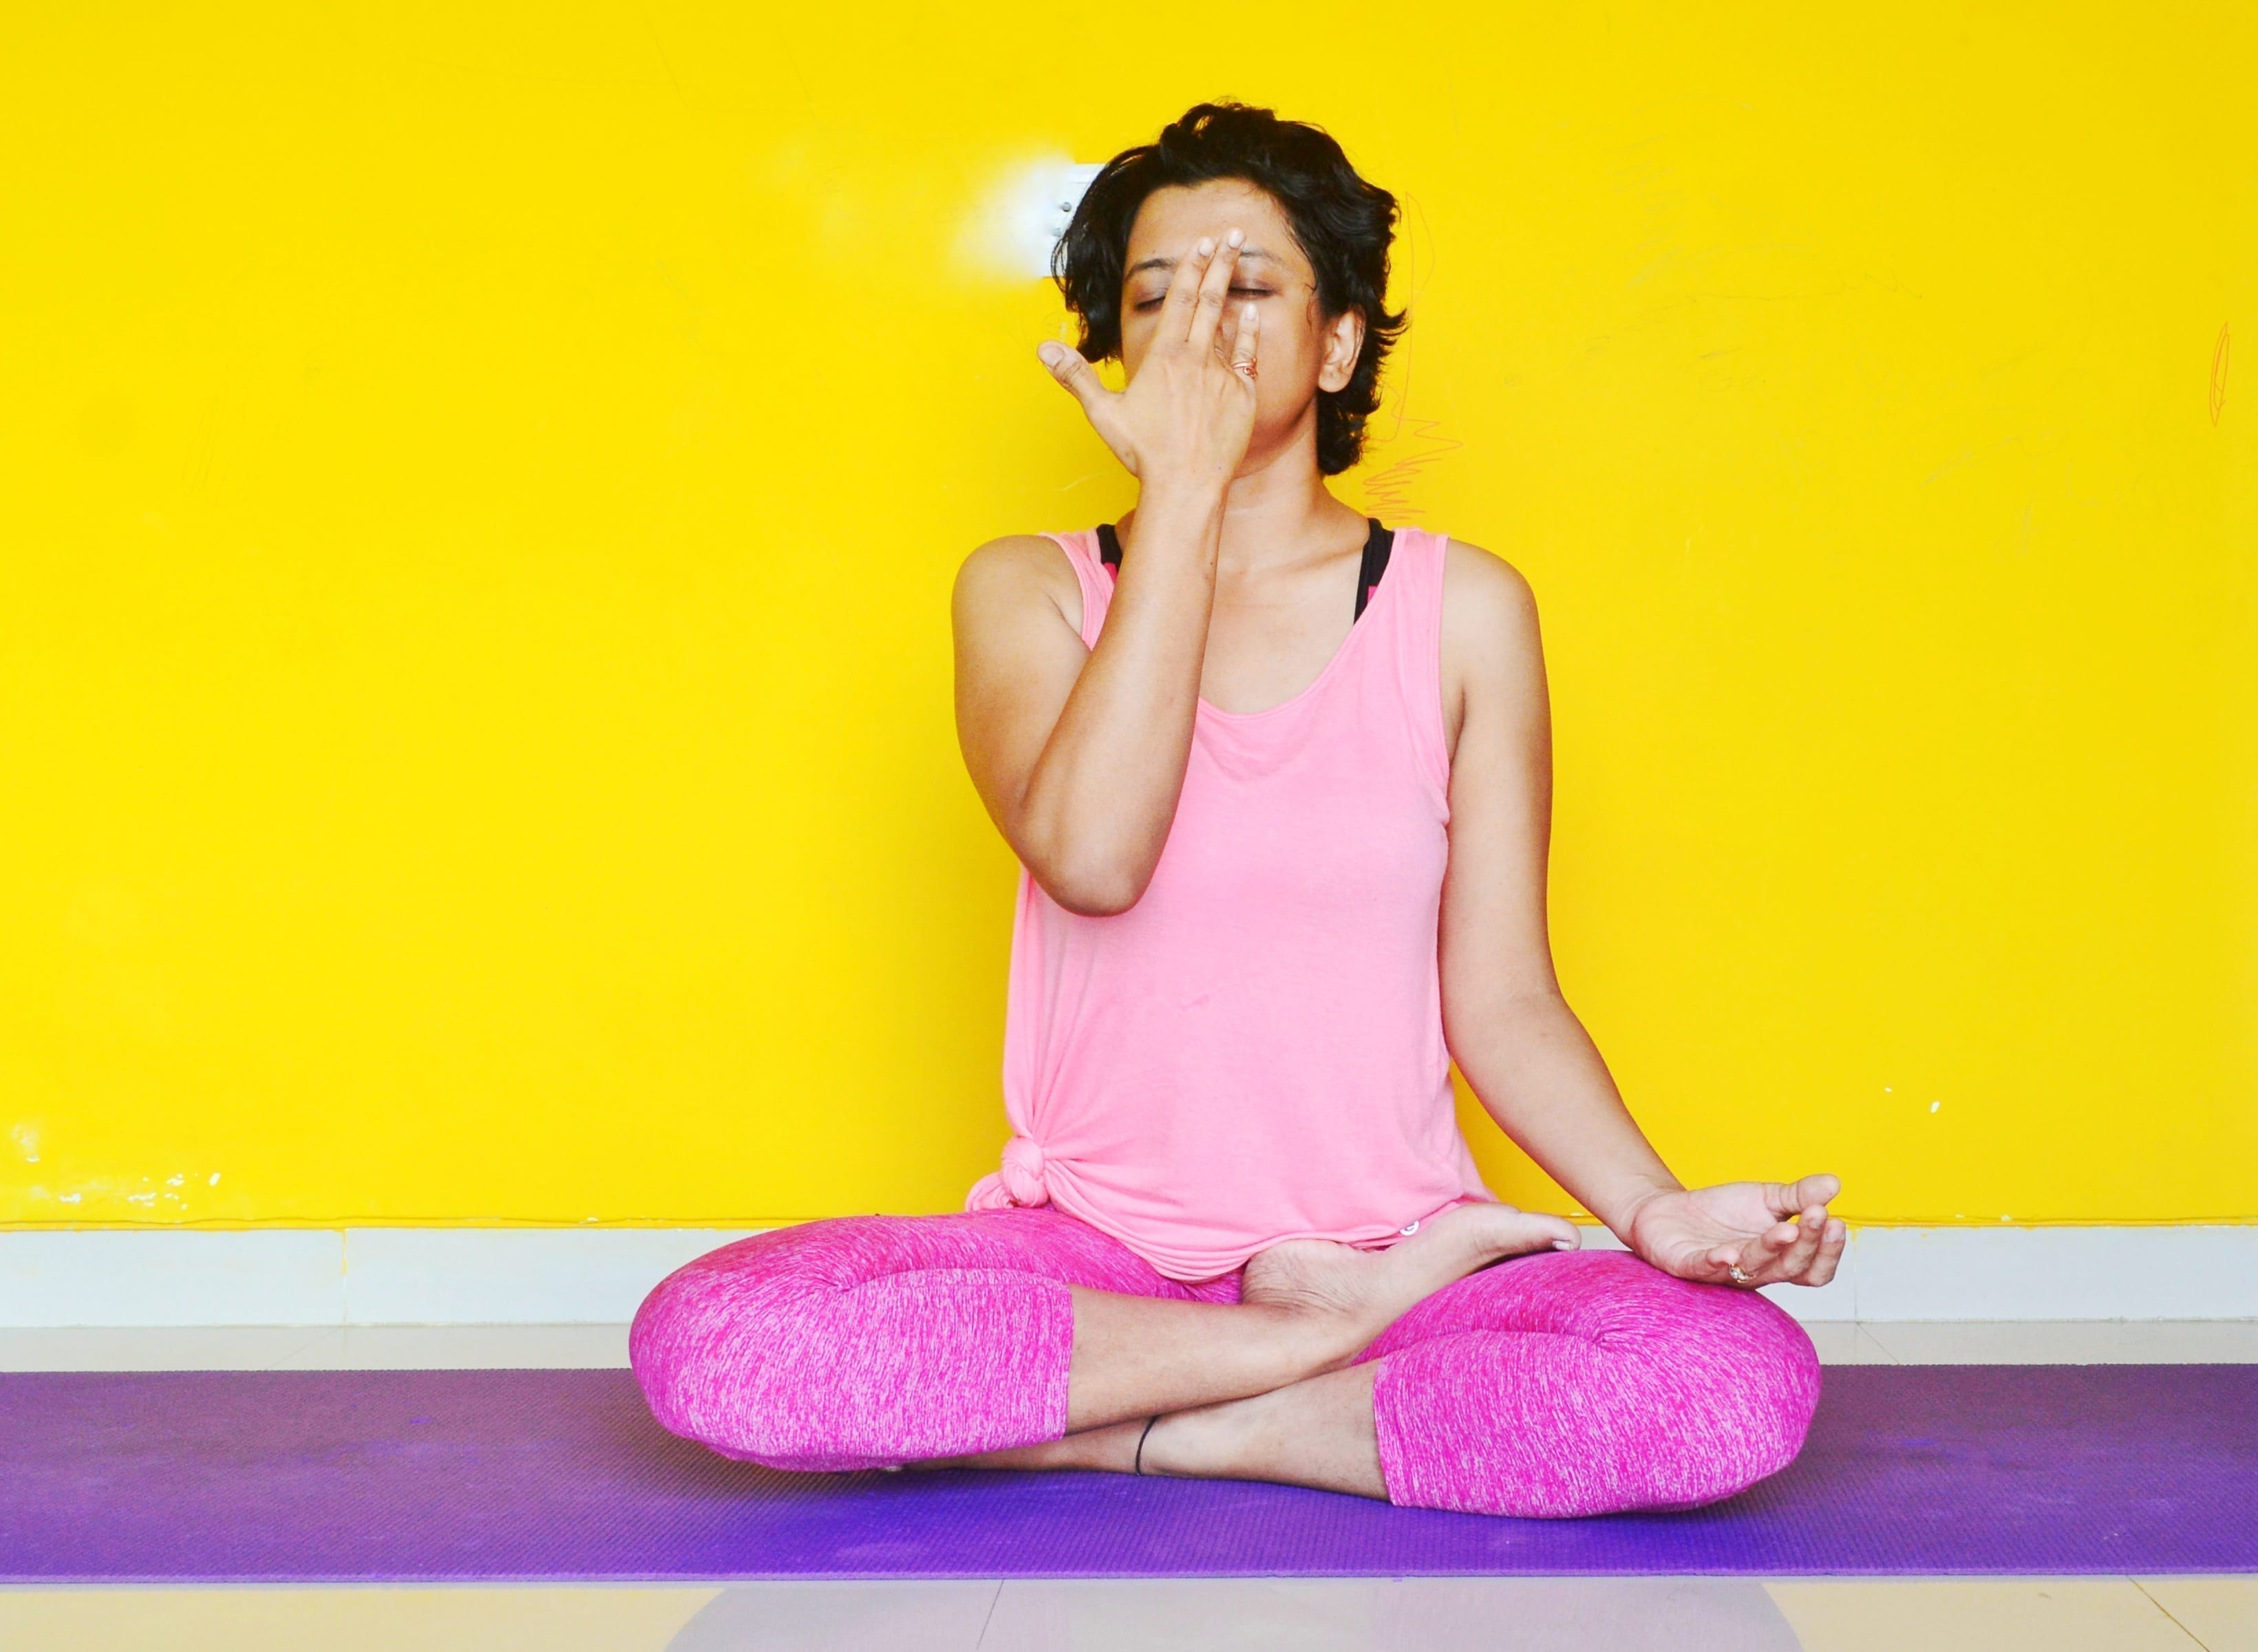
It purifies the subtle energy channels of the body and helps in easing breathing troubles. Body receives a larger amount of oxygen than normal breathing. It helps in improving lung function and respiratory endurance.
Step 1: Sit in a comfortable position with crossed legs. Gently close your right nostril with your thumb. Inhale through your left nostril, then close it with your ring-little fingers. Open and exhale slowly through the right nostril.
Step 2: Keep the right nostril open, inhale, then close it, and open and exhale slowly through the left. Repeat 3 to 5 times, then release the hand mudra and go back to normal breathing.


")


