
")
Sometimes it happens that in spite of spending a lot of time on doing something, we don’t achieve the required outcome. Be it a work assignment or daily household chores or something as simple as paying bills on time. At the end of the day it feels like nothing constructive happened today leading to frustration and irritation.
This is nothing but lack of focus. In such times we are doing a certain thing but our mind is somewhere else, probably planning the next meeting or a vacation. We as humans love to plan in advance, living in the future, and forget to stay in the present. Being in the present and being mindful is a big part of yoga. Just the awareness of every moment!
The minute you start living in the present you start paying attention to what is happening at that point, increasing your focus and general awareness. A simple example is when you are talking to a colleague, and if you start checking your messages on the phone you have already shifted your attention from the information which they were giving you and missed out the important details. This could lead to you being at loss.
Being focused helps you get control of your thoughts which will help you control your conscious mind. The conscious mind encompasses the thoughts we know we are having at any given moment. The subconscious is the part of our minds that makes decisions without our needing to actively think about them. It’s involved in information processing and affects everything we think, say and do.
The function of your subconscious mind is to store and retrieve data. Your conscious mind commands and your subconscious mind obeys. Hence control over your conscious mind indirectly means controlling what information you want to store in your subconscious mind. The minute you start harnessing the power of your subconscious mind , you will realize that the quality of your life improves drastically.
Some proven benefits are improved health and wellbeing, higher levels of creativity, more relaxed and composed state of mind, creates a sense of happiness and purpose in your life, ability to transcend limiting beliefs and problem solving capabilities. Now let’s learn how to improve focus with yoga!
Yoga Poses To Increase Focus
4 very important aspects of learning focus through your yoga practice are DRISHTI, BALANCING POSTURES , BREATHING and MEDITATION.
The Power of Drishti
Drishti is one of the most important parts of balancing postures. It means focus. Drishti is the point where you shift your “gaze” during the yoga practice. Drishti is the practice of steadying your gaze. Where your eyes go, your attention follows. When your gaze begins to wander, so do your thoughts.
While performing balancing postures in yoga, it is super important to find a drishti and stick to it throughout the duration of the posture. It’s always advised to find a still, non-moving point in front of you (at eye level) where you can focus their gaze without altering it in your practice.
By focusing your gaze on one spot, you are creating a balance not just in your external body but also in your internal being . And focusing your attention allows you to concentrate so much better.
Balancing Postures:
Balancing postures demand our full attention. The moment we lose focus, we fall down.
Beginner level
1. Tree Pose or Vrikshasana.
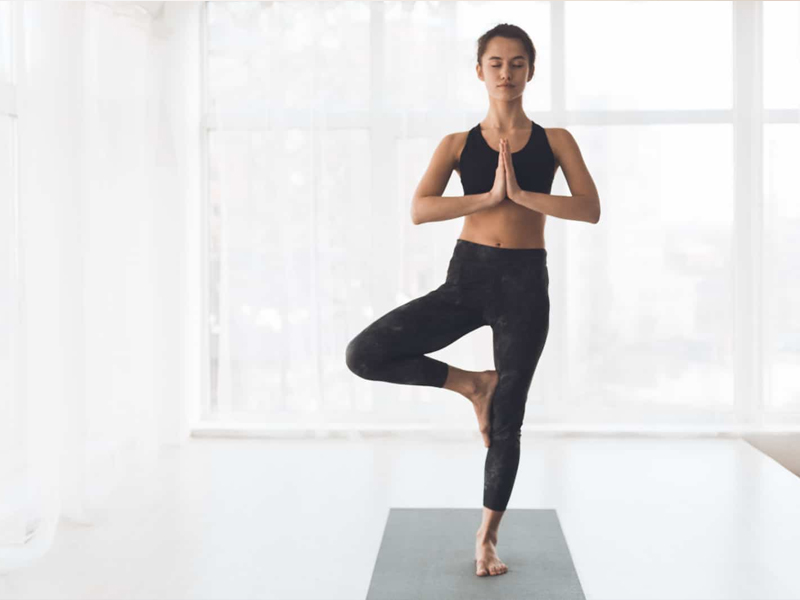
- Stand tall and straight with arms by the side of your body.
- Bend your right knee and place the right foot high up on your left thigh. The sole of the foot should be placed flat and firmly near the root of the thigh.
- Make sure that your left leg is straight. Find your balance.
- Once you are well balanced, take a deep breath in, gracefully raise your arms over your head from the side, and bring your palms together in ‘Namaste’ mudra (hands-folded position).
- Look straight ahead in front of you, at a distant object. A steady gaze helps maintain a steady balance.
- Ensure that your spine is straight. Your entire body should be taut, like a stretched elastic band. Keep taking in long deep breaths. With each exhalation, relax the body more and more. Just be with the body and the breath with a gentle smile on your face.
- With slow exhalation, gently bring down your hands from the sides. You may gently release the right leg.
- Stand tall and straight as you did at the beginning of the posture. Repeat this pose with the left leg off the ground on the right thigh.
Limitations:
Avoid doing this posture if you are suffering from migraine, insomnia, low or high blood pressure (those with high blood pressure may do this pose but without raising their hands overhead, as this may further raise their blood pressure).
2. Mountain Pose Of Tadasana
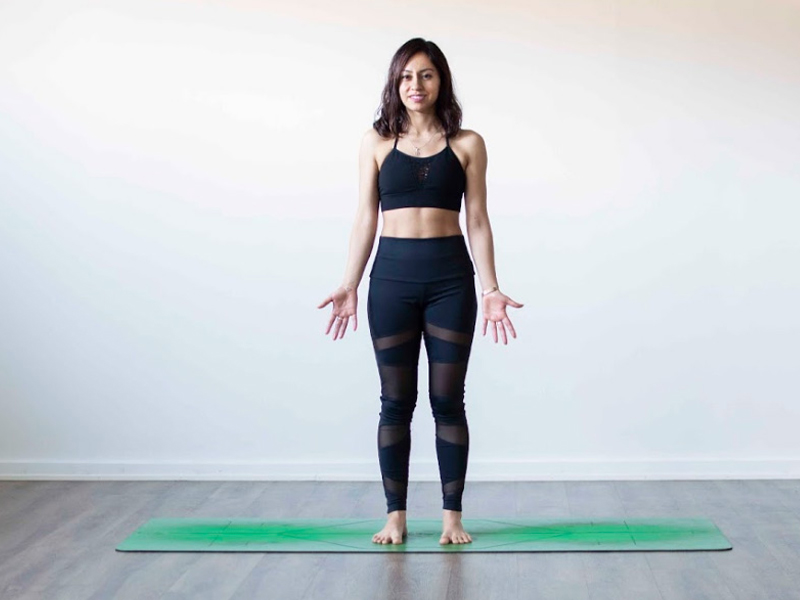
- Stand with your feet slightly apart and make sure that your weight is balanced equally on both feet.
- Inhale, raise your arms above your head, interlock your fingers with palms facing upwards.
- Raise your shoulders up towards your ears and on an exhale, roll your shoulders back and down your spine, opening your chest and straightening your posture and come on your toes.
- Relax all muscles in your face, including your tongue.
- Relax your eyes and maintain a steady gaze.
- Come back to your normal position and relax.
3. Dance Pose Or Natarajasana
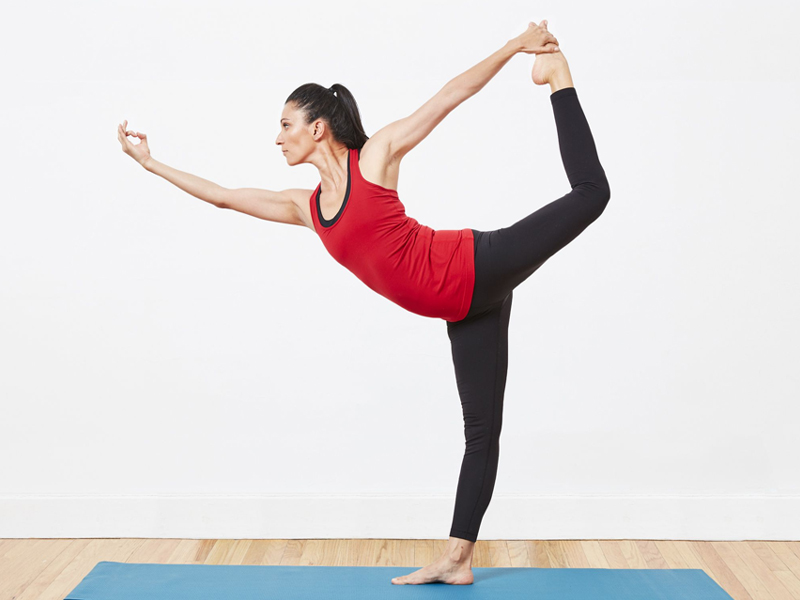
- Shift your weight onto the right foot. Bend your left knee to lift your left foot off the floor. Keep your left knee hugging toward your midline throughout this pose.
- Grasp the instep of your left foot with your left hand. Your thumb is resting on the sole of your foot and pointing in the direction of your toes.
- Lift your right arm straight up to the ceiling.
- Lift your left leg behind you as you bring your torso forward as a counterbalance. Remember that your left knee should not splay out to the side. Your right arm will also move forward.
- Kick your left foot strongly into your left hand to lift the leg higher and deepen the backbend. Keep your left toes active.
- Fix your gaze (Drishti) on something that doesn’t move so that you don’t lose the balance.
- Hold 5 to 10 breaths.
- Keep kicking your left foot into your left hand to rise back up. Lower your left leg back in line with your right. Repeat the pose on the other side.
Limitations
Avoid this pose if you have an ankle or back injury or if you have dizziness or balance problems. Be sure to protect your supporting knee by not locking it or hyperextending it (bending it too far backward).
4. Eagle Pose Or Garud Asana

- Begin by standing in Tadasana.
- Bend your knees and lift your left foot up to cross it over the right one.
- Ensure that the right foot is firmly placed on the floor and the left thigh is over the right thigh. Your left foot’s toes should be pointing downwards.
- Bring your arms forwards while keeping them parallel to the floor.
- Cross the right arm over the left one and bend your elbows so that your arms are now perpendicular to the floor. Ensure that the back of your hands are facing each other.
- Slowly turn the hands so that the palms face each other.
- Pressing the palms together, stretch the fingers upwards.
- Keeping your gaze focused at one place, stay in this pose for a couple of breaths.
- Slowly release the hands and bring them to the side of your body.
- Raise your left leg and place it back on the floor and slowly come back into Tadasana.
Limitations
Avoid practicing this pose if you’ve had a recent knee, ankle or elbow injury
5. Corpse pose or Shavasana
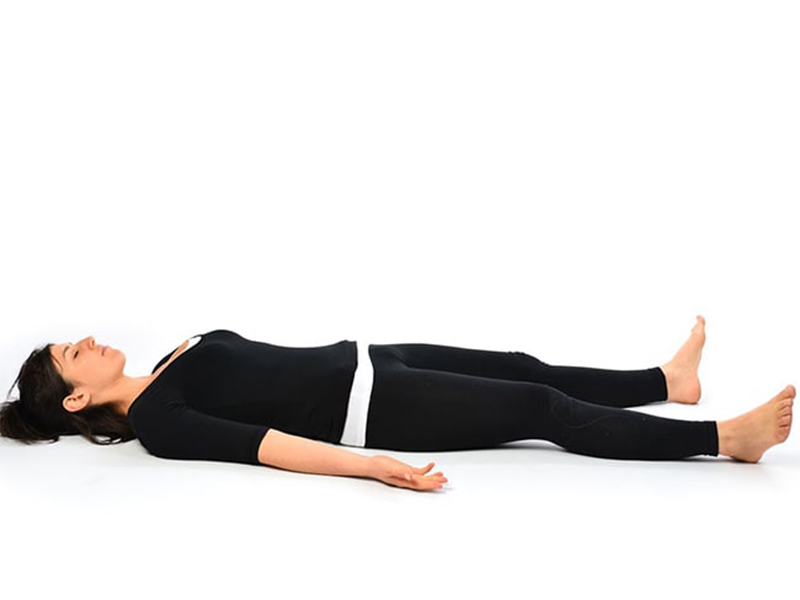
- Lie flat on your back, preferably without any props or cushions. Use a small pillow below your neck if absolutely required. Close your eyes.
- Keep your legs comfortable apart and let your feet and knees relax completely, toes facing to the sides.
- Place your arms alongside, yet a little spread apart from your body. Leave your palms open, facing upward.
- Taking your attention to different body parts one by one, slowly relax your entire body.
- Begin with bringing your awareness to the right foot, move on to the right knee (as you complete one leg, move your attention on to the other leg), and so on, and slowly move upwards to your head, relaxing each part of the body.
- Keep breathing slowly, gently, deeply and allow your breath to relax you more and more. Drop all sense of hurry or urgency or any need to attend to anything else. Just be with the body and the breath. Surrender the whole body to the floor and let go. Make sure you don’t fall asleep!
- After some time, about 10-20minutes when you feel fully relaxed, keeping your eyes closed, slowly roll onto your right side. Lie in that position for a minute or so. Then, taking the support of your right hand, gently sit up into a seated pose such as Sukhasana (Easy Pose).
- Keep your eyes closed and take a few deep breaths in and out as you gradually become aware of your environment and the body. When you feel complete, slowly and gently open your eyes.
Advance Level
1. Crane Pose or Bakasana
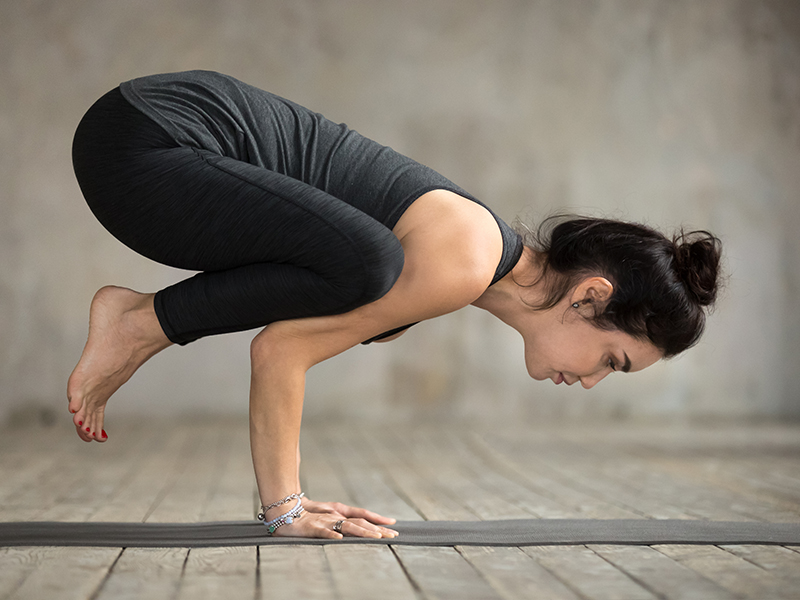
- Start by sitting in malasana.
- Extend the fingers of your hands and place the palms on the floor (shoulder width apart) right in front of your feet. Point the fingers forwards and keep the elbows slightly bent.
- Lean forward a little in order to bring the knees close to the armpits as much as you can. Transfer your body weight to your arms completely while your toes are still on the floor.
- Gently press your knees against the arms and slowly lift your big toes off the floor. Raise your buttocks a little and balance the body solely on your arms.
- Lift your head, lengthen your neck. Look straight to focus your gaze on a fixed point. Once you have secured the balance move your feet closer so as to bring the inner edges of your feet together.
- Breath normally and hold the position for 5 to 15 breaths.
- To come out of the pose slowly lower your feet to the floor. Relax the body taking slow and deep breaths.
Limitations
Don’t raise the buttocks too high as that puts excessive stress on the arms. Don’t try to jump your feet off the floor.
First, you need to transfer all your weight on your arms followed by lifting your feet off the ground.
People who suffer from any of these conditions must avoid practicing Bakasana: recent wrist or shoulder injury, heart problems, carpal tunnel syndrome or cerebral thrombosis.
2. Warrior 3 or Virabhadrasana 3
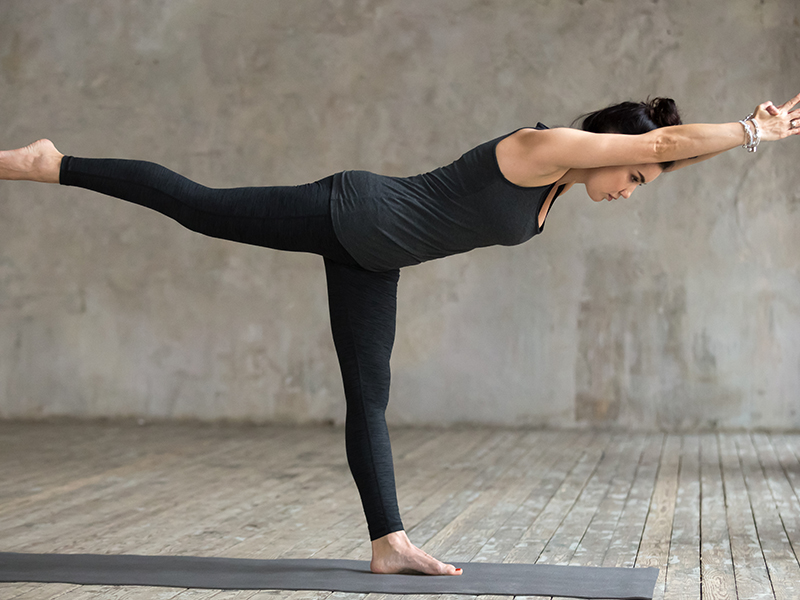
- Starting Position: Tadasana (Mountain Pose)
- Take a deep inhalation and step your legs 4 to 5 feet apart.
- With an exhalation turn the right foot 90 degree to the right and the left foot 45-60 degree to the right.
- Bend the right knee till your thigh becomes parallel to the floor and perpendicular to your shin. The knee must be aligned right over your heel, ensure it doesn’t extend beyond the heel.
- Exhale and bend your trunk forward till your chest rests on your thigh. Bring your arms close to join both of your palms. Keep the arms straight. Hold this position for 2 breaths.
- Slowly shift the weight of your body on your right leg as you lift the left leg off the floor. Simultaneously raise your left leg (keeping it straight) and straighten your right leg. The knee of the left leg must face downward. Look either straight or down.
- The whole body except the right leg becomes parallel to the floor in the final position of Warrior 3. Once you find balance, stretch your hands forward and your leg backward. Retain the pose from 5 to 30 seconds taking deep breaths.
- To come out of the pose, exhale and lower the left leg back onto the floor along with bending the right leg. Practice again from the other side.
Limitations
Avoid practicing Virabhadrasana if you suffer from any of these conditions: heart problems, severe neck or shoulder pain, knee pain, high blood pressure or recent chronic illness. If you suffer from spinal ailments avoid practicing warrior pose. Keep the head in neutral position if you are experiencing neck pain or had a neck injury recently.
3. Extended Hand-to-Big Toe Pose or Utthita Hasta Padangusthasana
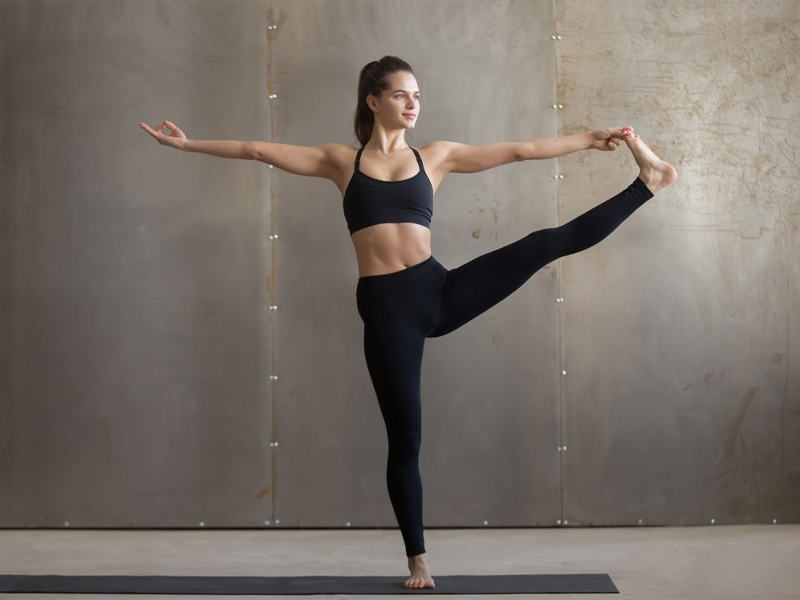
- From Tadasana, bring your left knee toward your belly.
- Reach your left arm inside the thigh, cross it over the front ankle, and hold the outside of your left foot. If your hamstrings are tight, hold a strap looped around the left sole
- Firm the front thigh muscles of the standing leg, and press the outer thigh inward.
- Inhale and extend the left leg forward. Straighten the knee as much as possible. If you’re steady, swing the leg out to the side. Breathe steadily; breathing takes concentration, but it helps you balance.
- Hold for 30 seconds, then swing the leg back to center with an inhale, and lower the foot to the floor with an exhale. Repeat on the other side for the same length of time.
Limitations
Ankle or lower back injuries
4. Headstand or Shirshasana

- Sit in Vajrasana, and bend forward with folded forearms resting on the ground with interlocked fingers.
- The head and the hands are on the floor and form a triangle.
- Place the crown of the head between the interlocked fingers.
- Slowly, balance the head on the fingers.
- Lift the knees and glutes off the floor and straighten them.
- Slowly walk the feet towards the trunk.
- Now, prepare to lift yourself off the floor – bend the knees, keeping the heels near the buttocks, and slowly straighten the hips so that the thighs are perpendicular to the floor.
- Slowly straighten the knees and the calves till the entire body is vertical – one straight line with the feet relaxed.
- Balance the body and maintain this position for a few seconds or as long as you are comfortable. Advanced yoga practitioners may start off with a minute and then work their way to at least five minutes.
- Focus your attention on the breath, and the head region.
- While coming back, follow the steps in reverse order.
- Slowly, fold the legs and bring the thighs back to the perpendicular position.
- Slowly, drop the legs to the ground.
- To regain balance from the inverted position, sit in Shishuasana (Child Pose) for some time.
- Release the hand position, and sit in Vajrasana.
- Rest for a few minutes in Savasana (Corpse Pose).
Limitations
Learn this asana under the guidance of an instructor. Only practice on your own when your instructor gives the go-ahead.
Have patience and take it slowly. Mastering this asana takes time.
Ensure that you perform it close to a wall for stability especially if you are a beginner or have just started doing it.
Always be mindful of the placement of your neck.
Avoid doing this during menstrual cycles.
The entire weight of your body is supported by the muscles in the hands, neck, and shoulders. If you have spondylitis, please speak to your yoga instructor before starting this asana.
People with heart conditions, vertigo, and high blood pressure also need to be cautious.
5. Half Moon pose or Ardha Chandrasana

Breath
Equal breathing
Bhramari
Nadi Shodhan
Anulom Vilom
Meditation
Counting with breath
Mantra Chanting
Tratak
Lifestyle Changes To Build Focus
Once you have started on your path to yoga a few lifestyle changes are recommended to work on building your focus. These are yogic concepts which should be applied in our daily life.
- Do one thing at a time, for example if you are eating your dinner focus on chewing and avoid talking. Avoid watching tv or reading.
- Be attentive when someone is talking to you. We are often very distracted when someone is speaking to us.
- Create a time table and try to stick to it. This will help time management.
- Bring a certain discipline in your life.
- Always think positive. For example when the phone rings and it’s your boss. The first thing we think is what did I do wrong now. Remove this pattern of thought.
- Stay out of matters that don’t concern you. A cluttered mind finds it difficult to concentrate.
These are small changes to bring about in our daily lives which will over a period of time become a habit and lead to a better sub conscious state of mind. To know more, you can follow Supriya on Instagram, @baikerikar_yoga.